

A2P Campaign Registration: Step-by-Step Guide
This guide walks you through A2P 10DLC Campaign registration, including how to choose between Chat Widget Setup and Manual Setup, select the correct messaging use case, complete consent requirements, and submit your Campaign for carrier review.
Campaign registration is required after Brand registration approval to send SMS messages from applicable standard 10-digit local phone numbers in the United States.
Before You Start
Your Brand must be eligible to continue into Campaign registration. Campaign registration is required after Brand registration is approved.
If you are completing Brand and Campaign registration in one workflow, the registration flow will guide you into Campaign Details when the Brand portion is ready to proceed.
Before continuing, make sure Brand registration is approved or eligible to proceed and that your business website is live and accessible for carrier verification.
What is a Messaging Use Case?
A messaging use case describes the primary purpose of the SMS messages your business sends. Accurate classification helps carriers understand the type of communication recipients have agreed to receive.
Chat Widget Setup supports Marketing / Promotional, Informational / Non-Marketing, and Mixed. Select Mixed when one messaging program genuinely includes both promotional and informational messages. When Mixed is selected, the Campaign Use Case is automatically set to Low Volume Mixed.
Messaging Volume Options
Standard Brand Campaigns may provide different messaging-volume options. The available option determines applicable throughput capacity and registration requirements.
Low Volume Standard Brand is a messaging-volume option and is different from the Low Volume Mixed Campaign use case. When Mixed is selected in Chat Widget Setup, the Campaign Use Case is automatically set to Low Volume Mixed.
Chat Widget Setup vs. Manual Setup
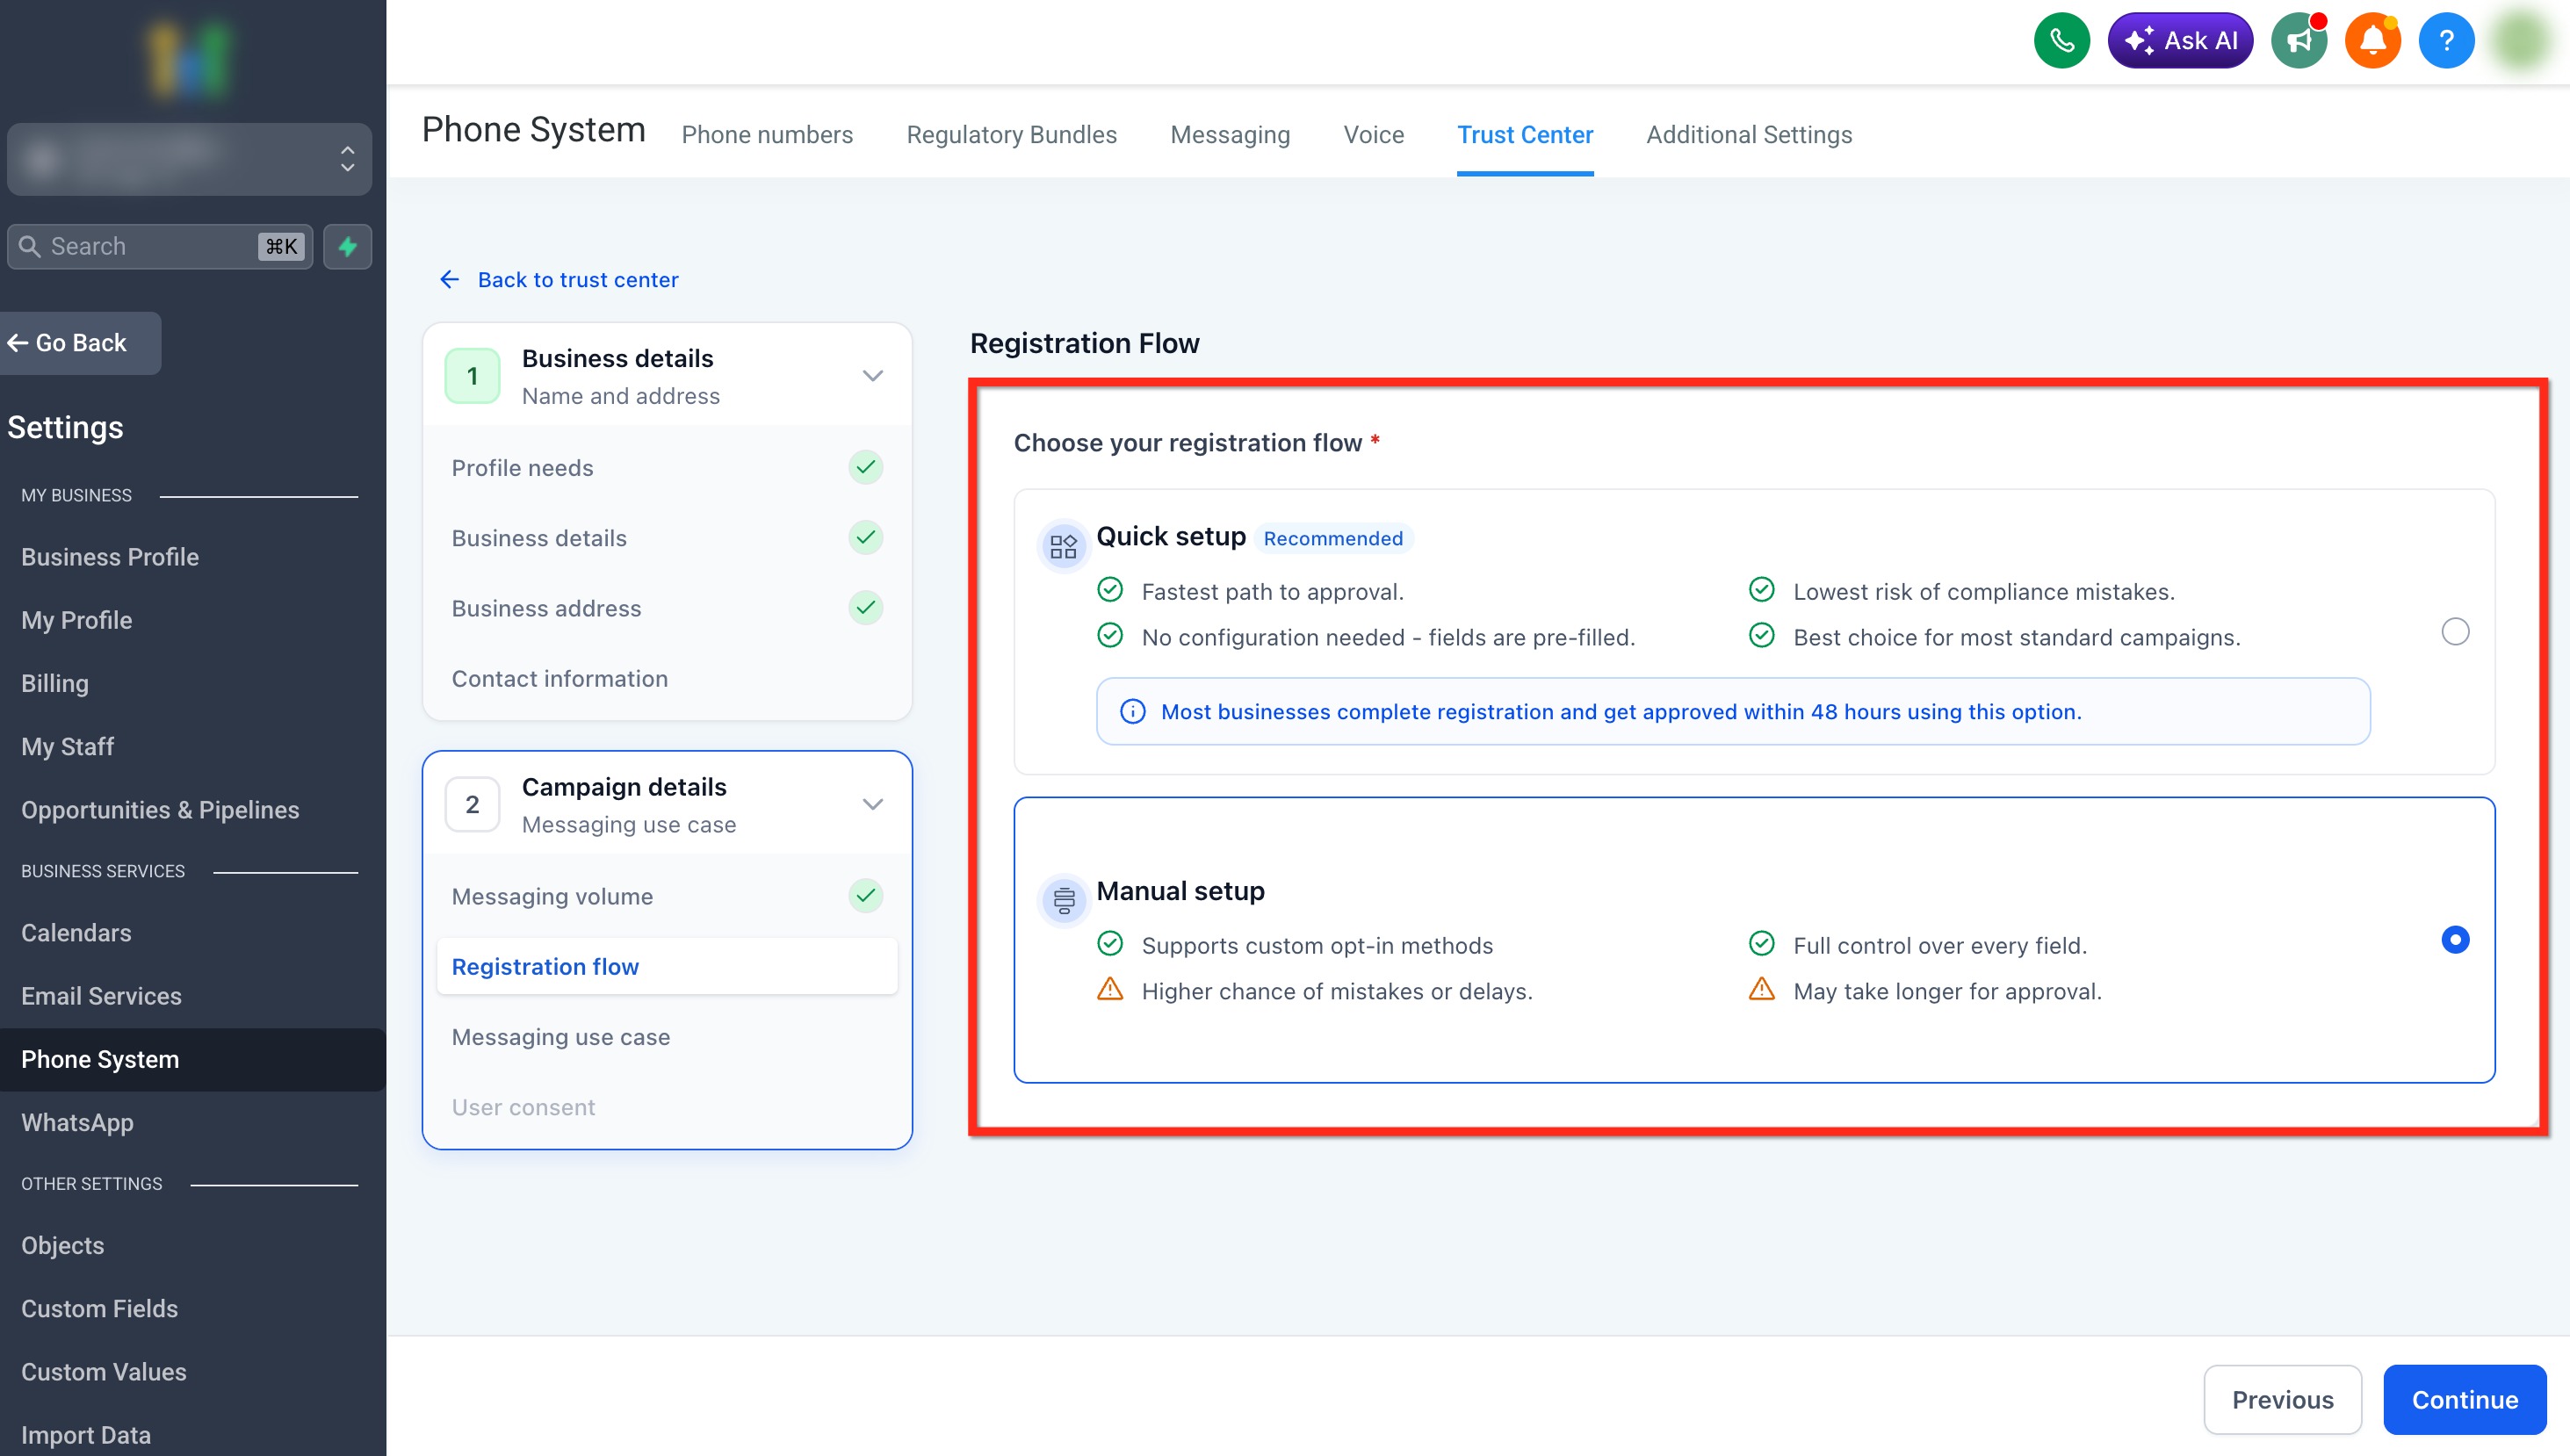
Two setup paths are available for Campaign registration. Choose the method that matches how your business collects SMS consent.
Chat Widget Setup opens by default and uses a generated opt-in widget with pre-filled Campaign information to simplify registration. The guided flow supports Marketing / Promotional, Informational / Non-Marketing, and Mixed messaging programs.
If your business already collects SMS consent through another approved method, switch to Manual Setup. Manual Setup supports methods such as existing website forms, paper forms, lead forms, QR codes, kiosks, and verbal consent.
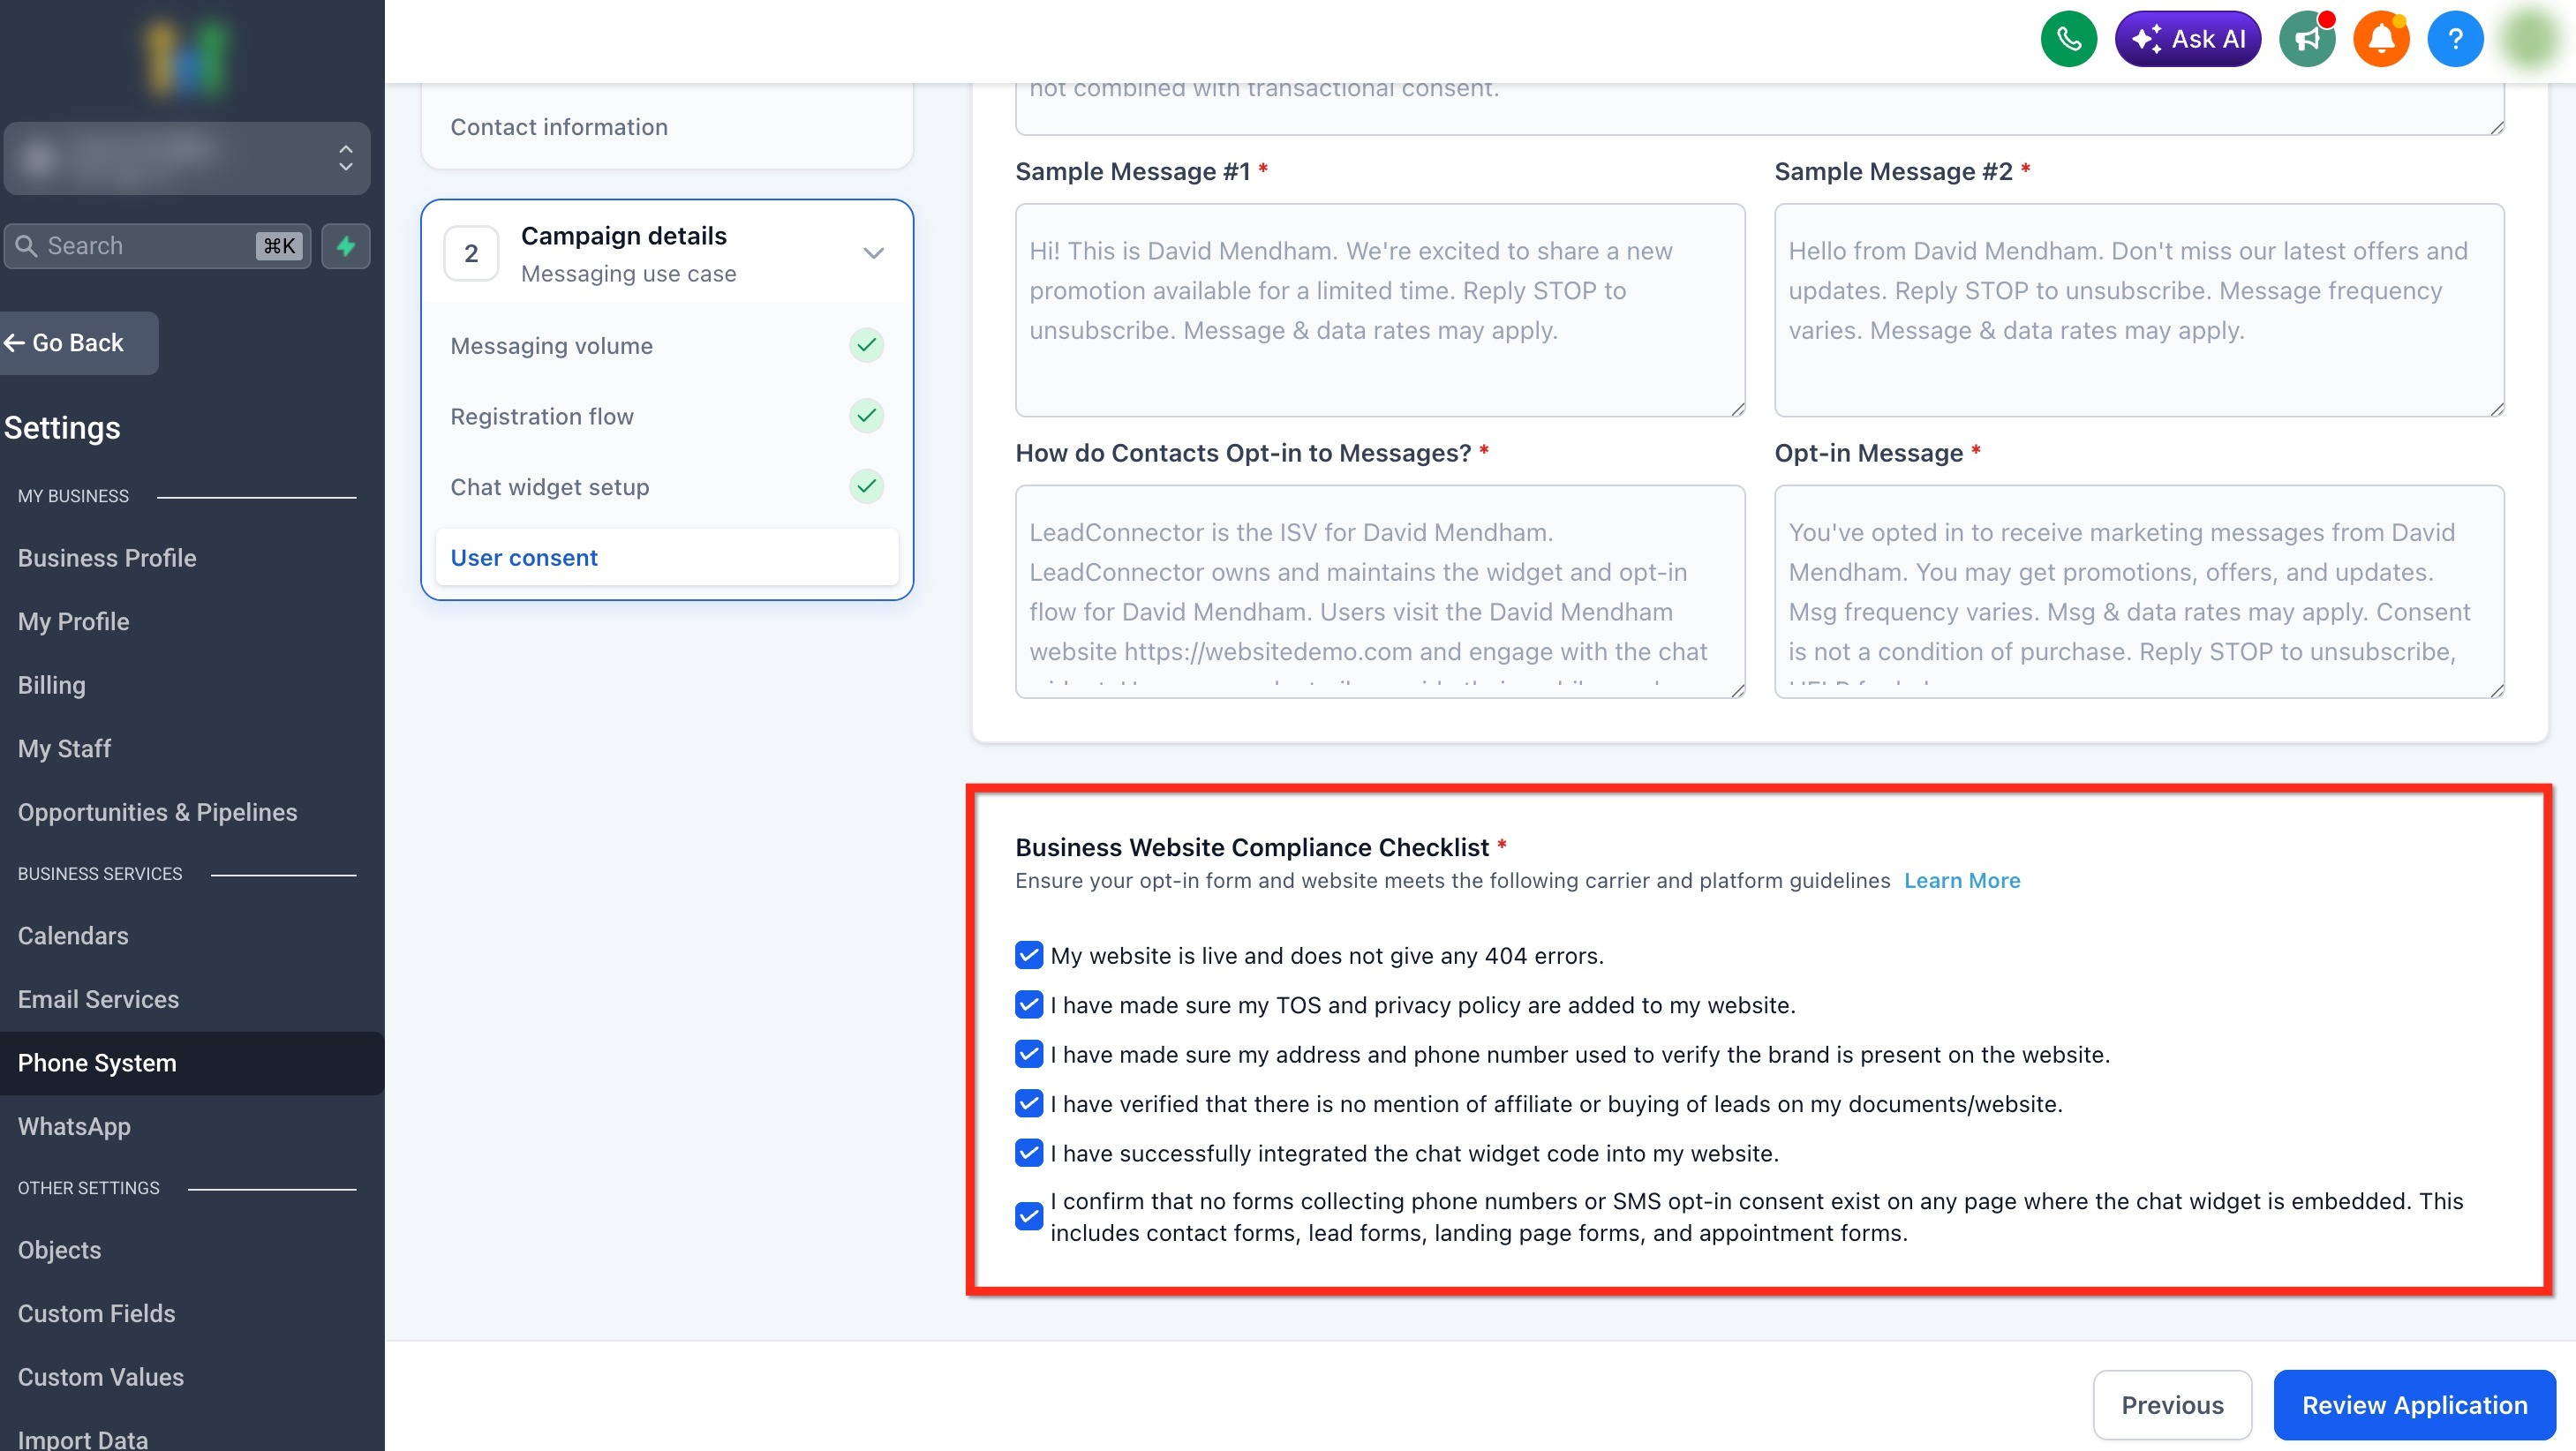
If you switch to Manual Setup and later decide to use the Chat Widget, you can return to Chat Widget Setup — recommended from the Campaign details step panel.
How to Access Campaign Registration
Campaign registration can be accessed after completing Brand registration or from Trust Center when creating an additional Campaign for an existing approved Brand.
Go to Settings > Phone System > Trust Center. Under A2P Messaging (SMS), open Brand & Campaigns.

Open the Campaigns tab and select Create Campaign. Choose the Brand you want to use, then continue into Campaign setup.
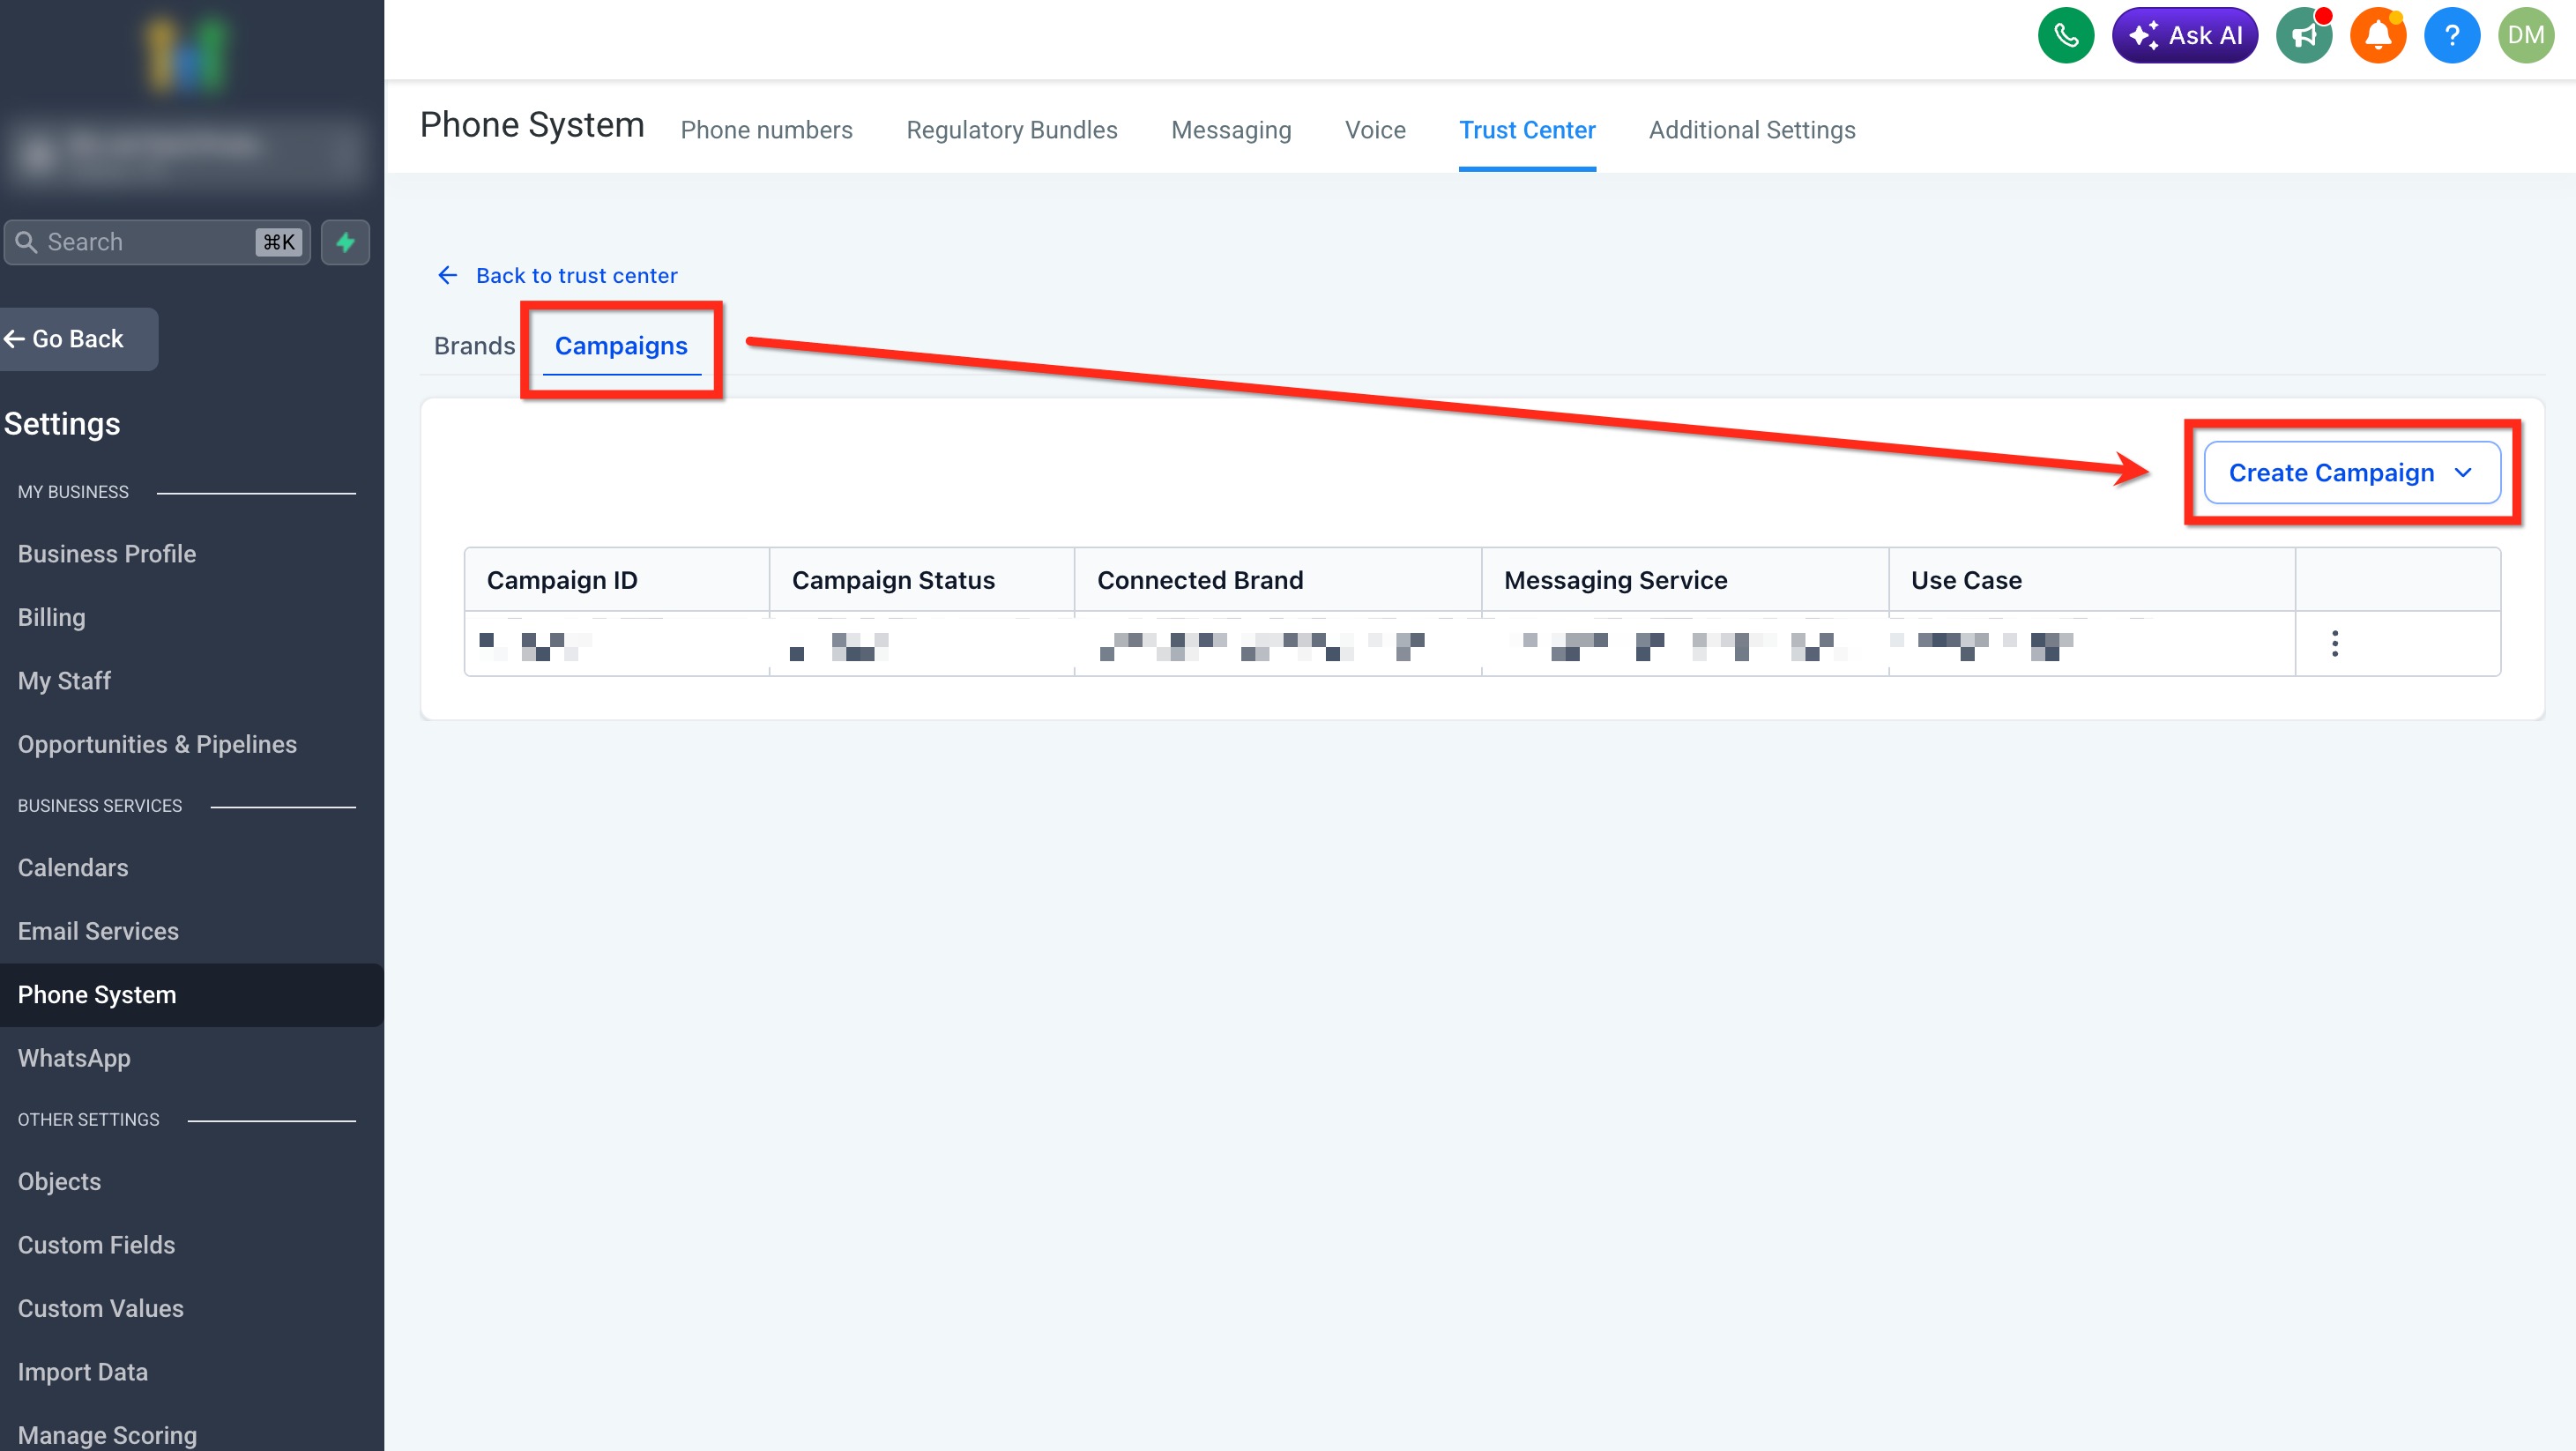
How to Register an A2P Campaign
After accessing Campaign registration, complete the setup steps below. Your Brand type, messaging volume, use case, and consent method determine the information required.
Select the messaging-volume option available for your Brand type that best matches your expected business texting needs.
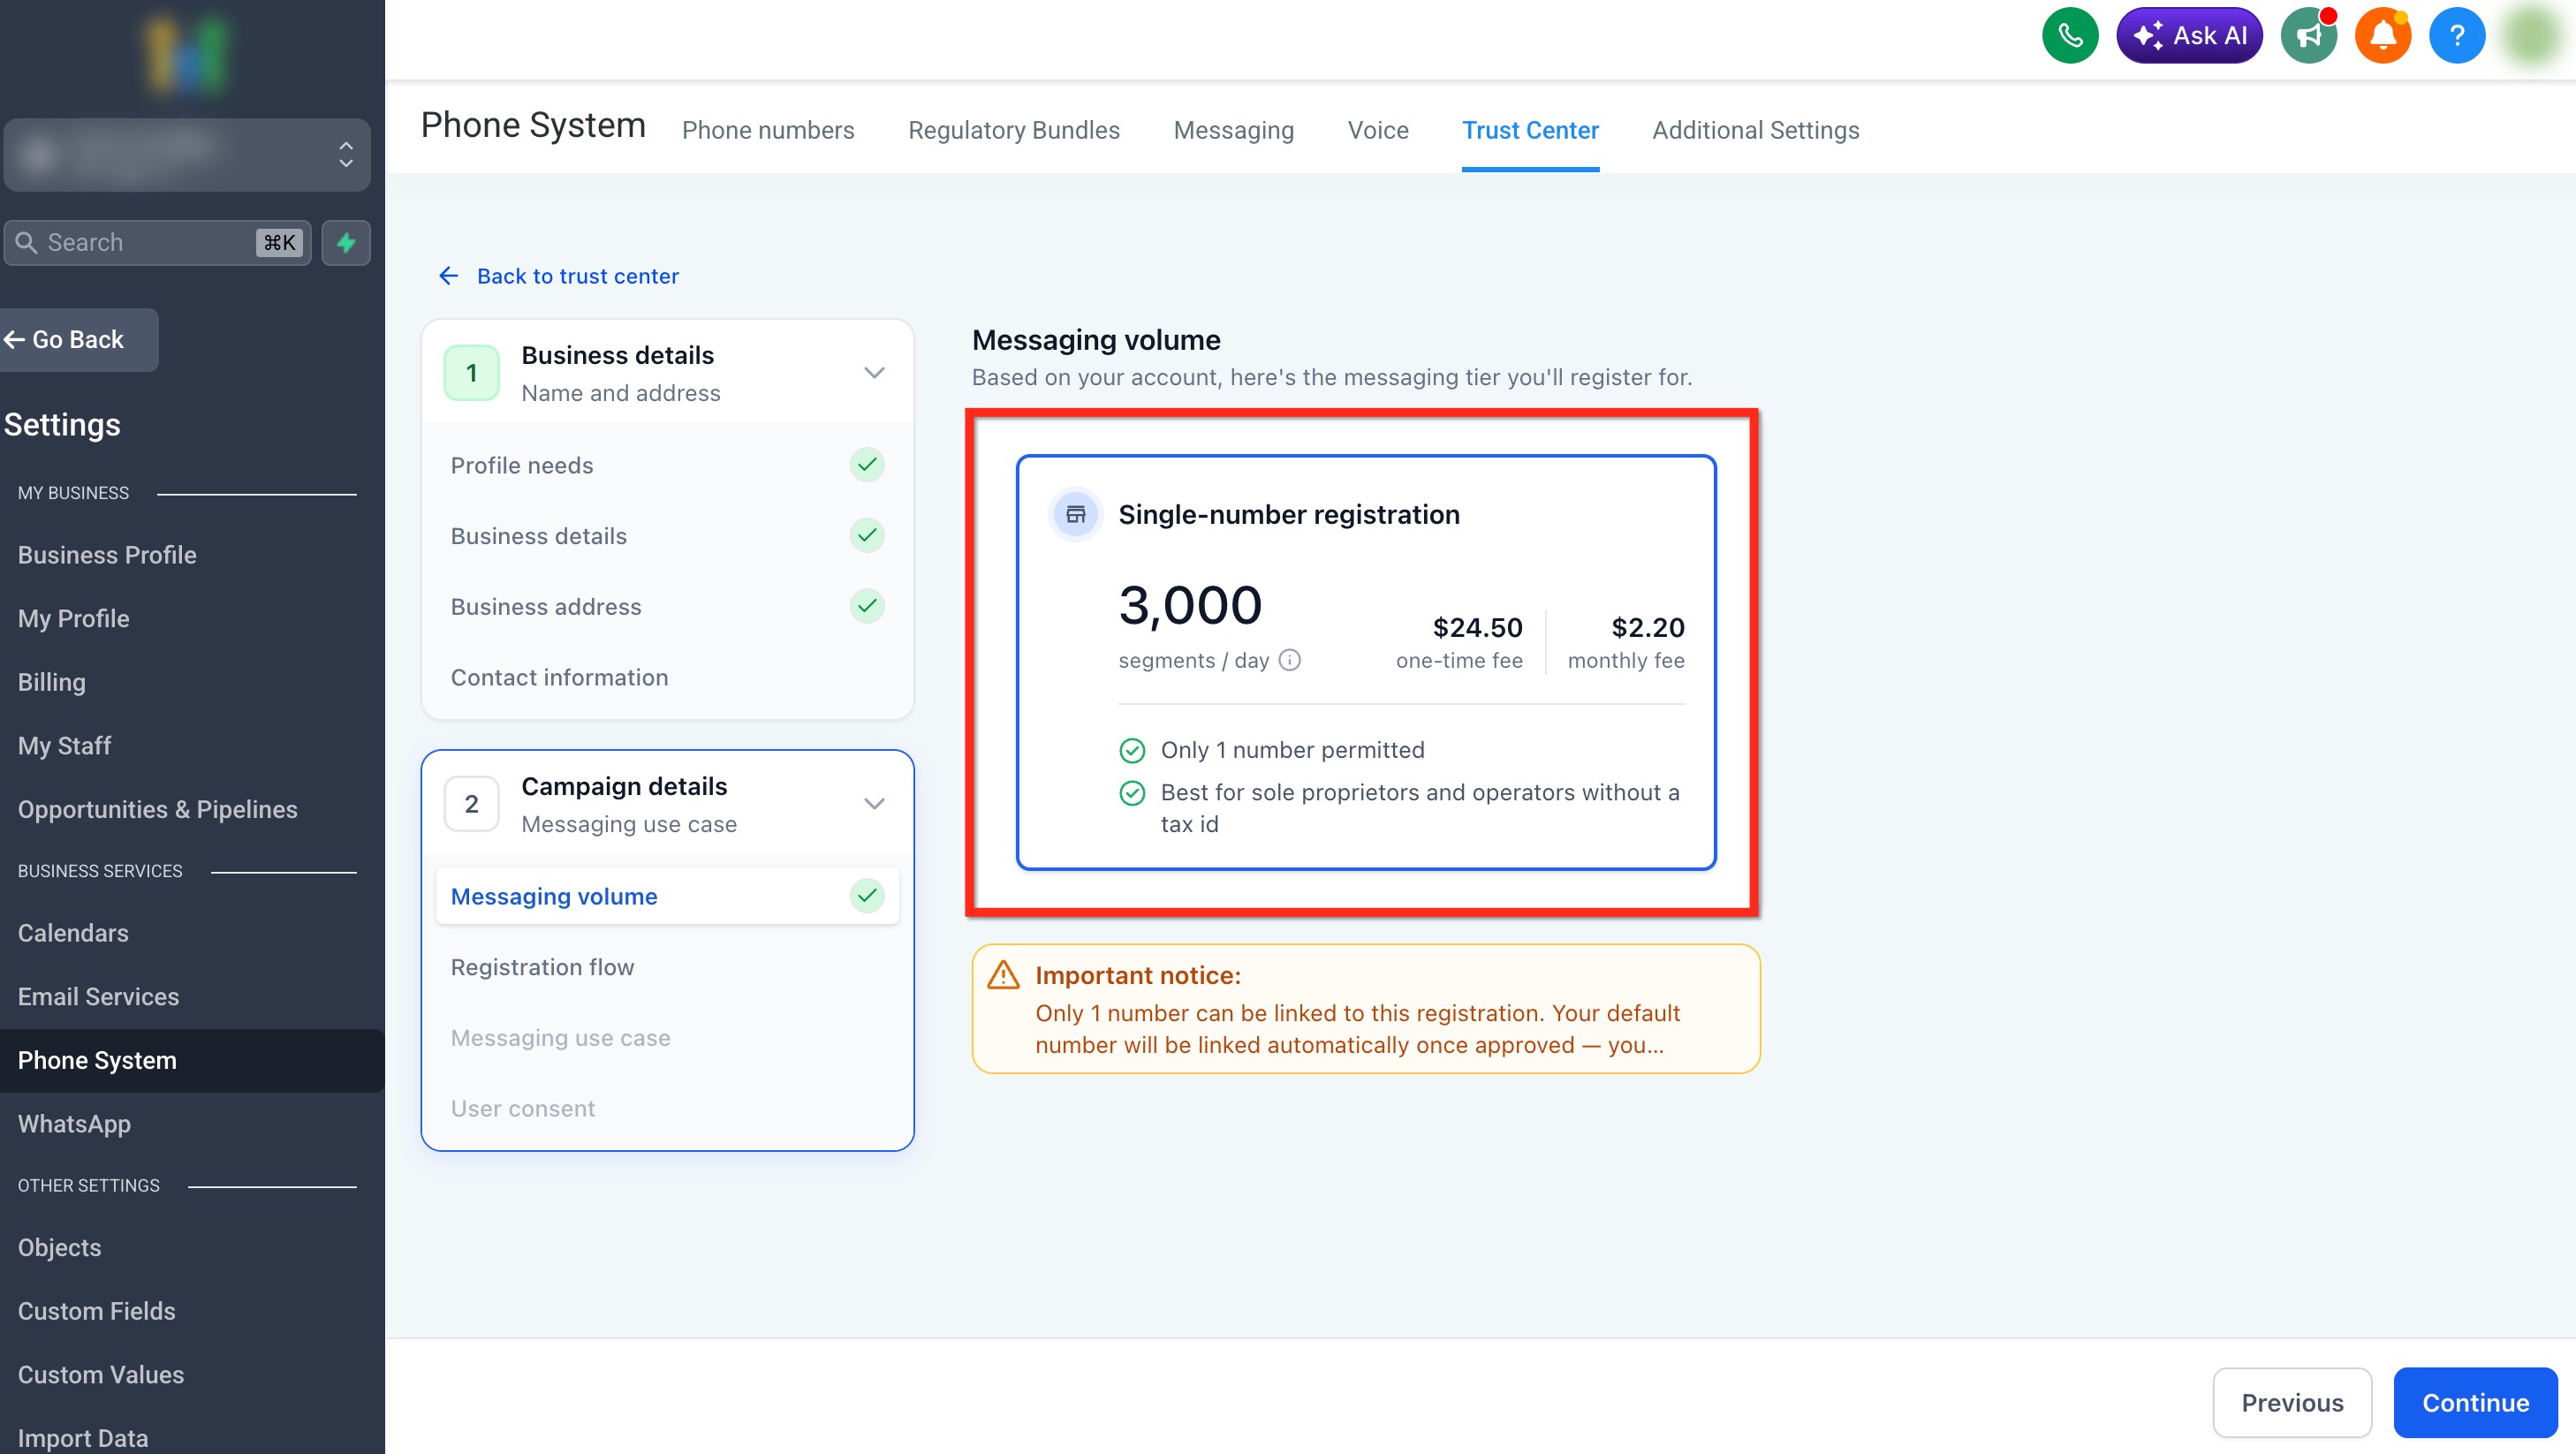
Campaign registration opens in Chat Widget Setup by default. This path uses a generated opt-in widget and pre-fills Campaign information to simplify registration.
If your business collects SMS consent through another approved method, select Switch to manual setup.
You can return to Chat Widget Setup from Manual Setup by selecting Chat widget setup — recommended from the Campaign details step panel.
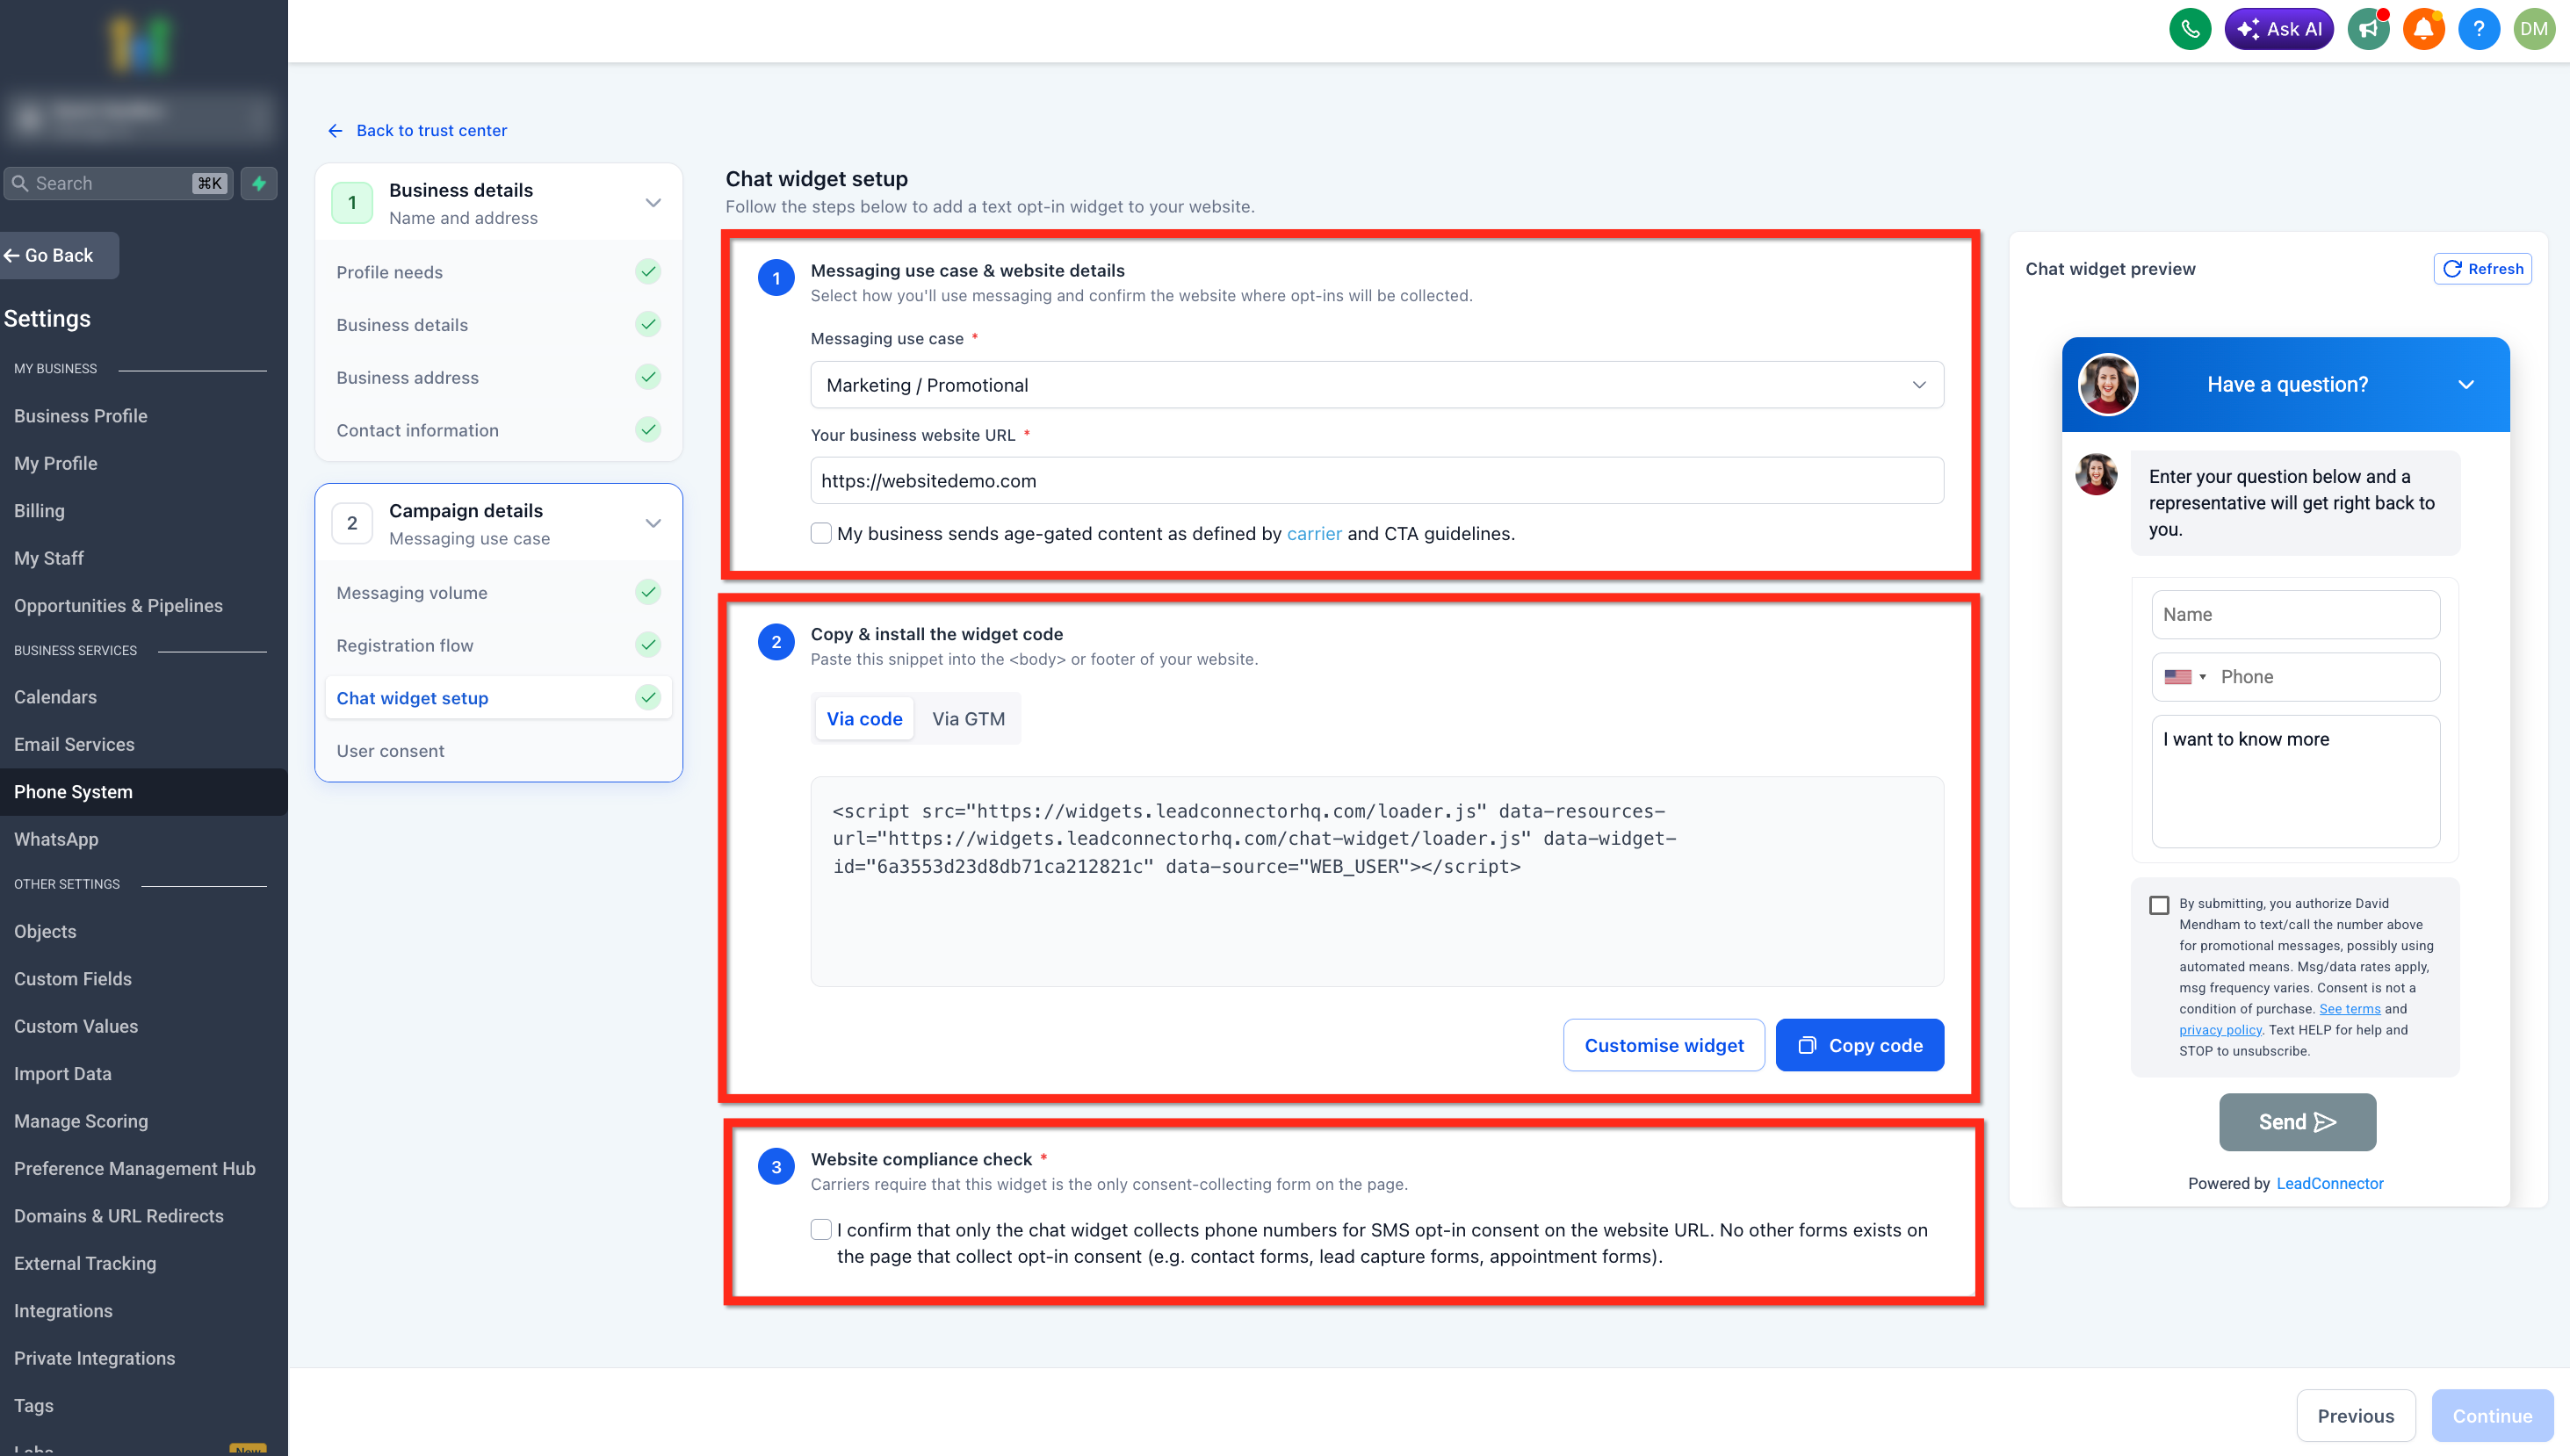
Complete Chat Widget Setup
Messaging Use Case, Widget Setup, and Compliance
Chat Widget Setup combines messaging-use-case selection, website information, widget installation, and consent configuration into one guided registration experience.
- Messaging use case:Select the option that accurately represents the messaging program:
- Marketing / Promotional for promotional messaging.
- Informational / Non-Marketing for transactional or informational messaging.
- Mixed when the same program includes both promotional and informational communication.
-
When Mixed is selected, the Campaign Use Case is automatically set to Low Volume Mixed.
- Business website URL: Enter the live, publicly accessible website where contacts will provide consent. The website should represent the same business used during Brand registration.
- Age-gated content: Select this option when the messaging program includes applicable age-restricted content.
Mixed is intended for one messaging program that includes both informational and promotional communication. Selecting Mixed automatically assigns Low Volume Mixed and generates separate consent choices for each message category.
Copy the widget code provided in Chat Widget Setup and install it on the submitted website page. Use Copy code to copy the snippet, then add it to the appropriate body or footer area of your website.
Make sure the widget is fully installed and publicly visible before continuing.
The Chat Widget should be the only form on the submitted page collecting SMS consent.
Do not place another SMS opt-in form, such as a Contact Form, Lead Capture Form, or Appointment Form, on the same submitted page.
After completing Chat Widget Setup, the registration flow automatically generates the use case description, sample messages, opt-in method information, and consent-related content needed for review.
If Mixed is selected, the generated Chat Widget includes two independent consent checkboxes: one for informational/transactional messaging and one for marketing/promotional messaging. Neither checkbox is pre-selected, and each consent choice includes its own locked disclosure content.
Review the generated information carefully to confirm it matches your business and messaging intent.
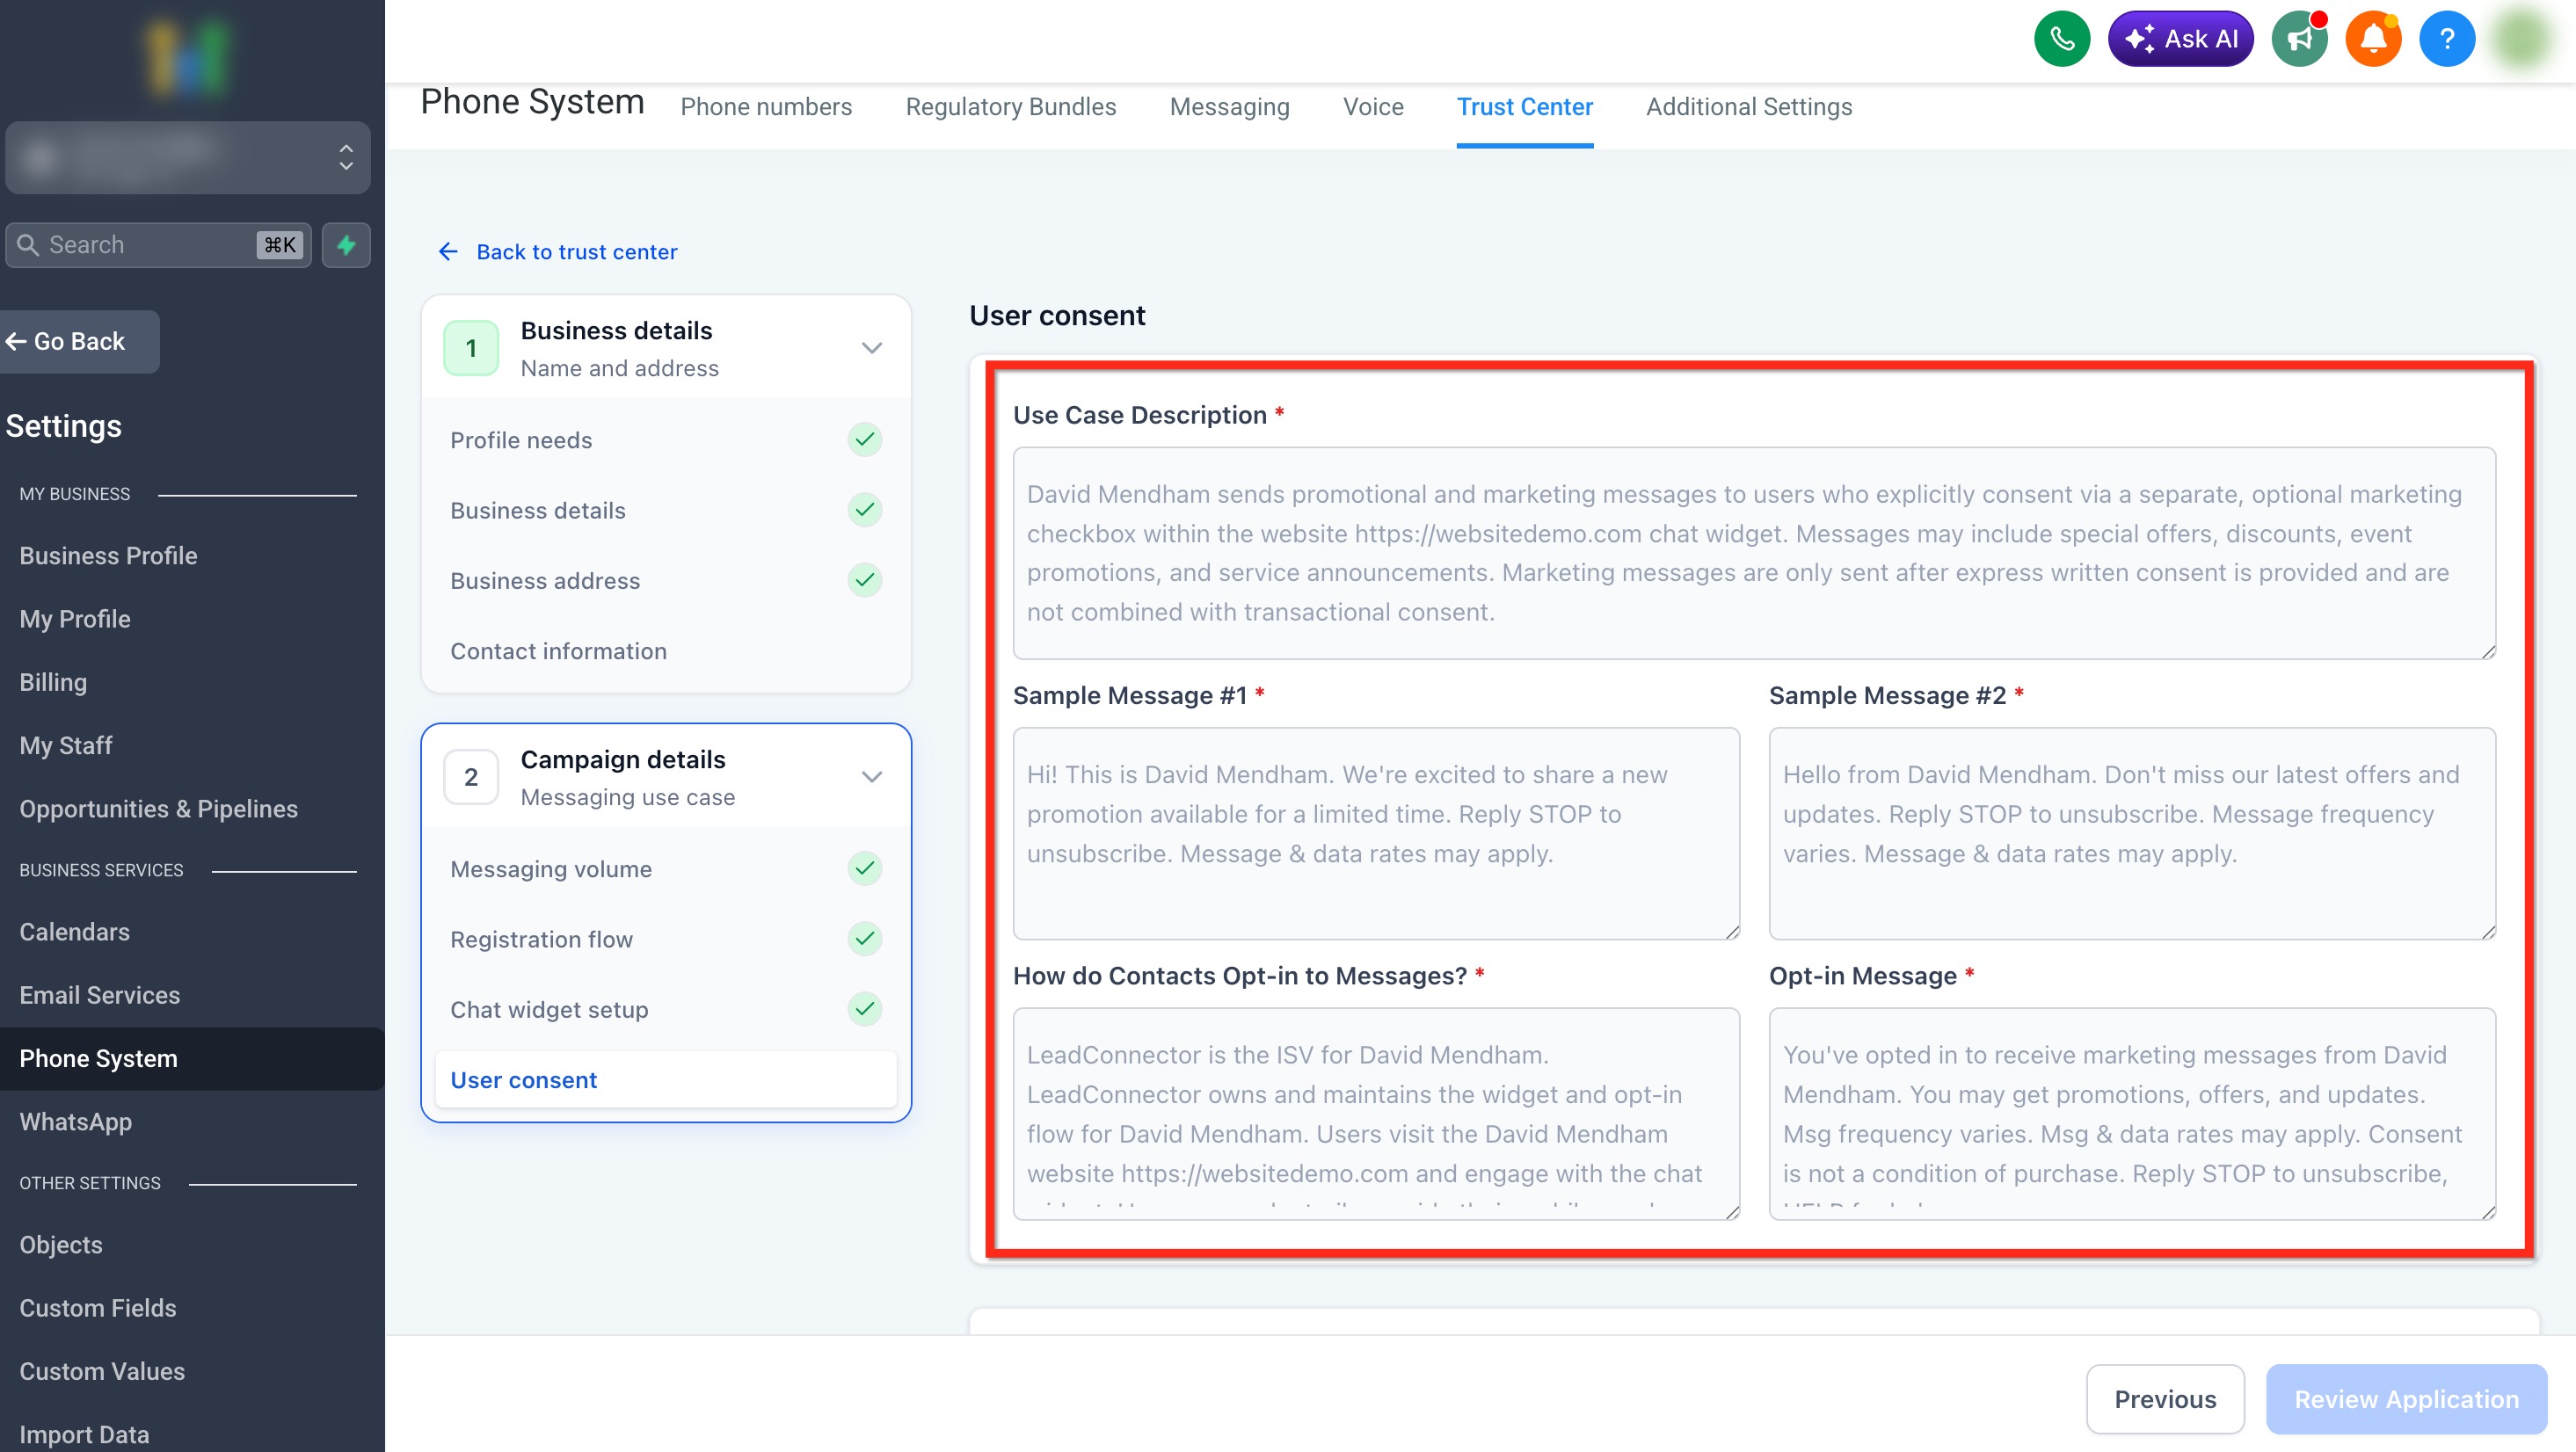
The website compliance checklist helps confirm that the submitted business information, consent experience, and required website content are accessible before final review.
After reviewing all checklist items, select Review Application, then continue to the compliance review.
Complete Manual Setup
Use Manual Setup when your business collects SMS consent through an approved method other than the generated Chat Widget.
From Chat Widget Setup, select Switch to manual setup, then enter the required Campaign and consent information for your existing opt-in method.
Tip: To return to Chat Widget Setup, select Chat widget setup — recommended from the Campaign details step panel.
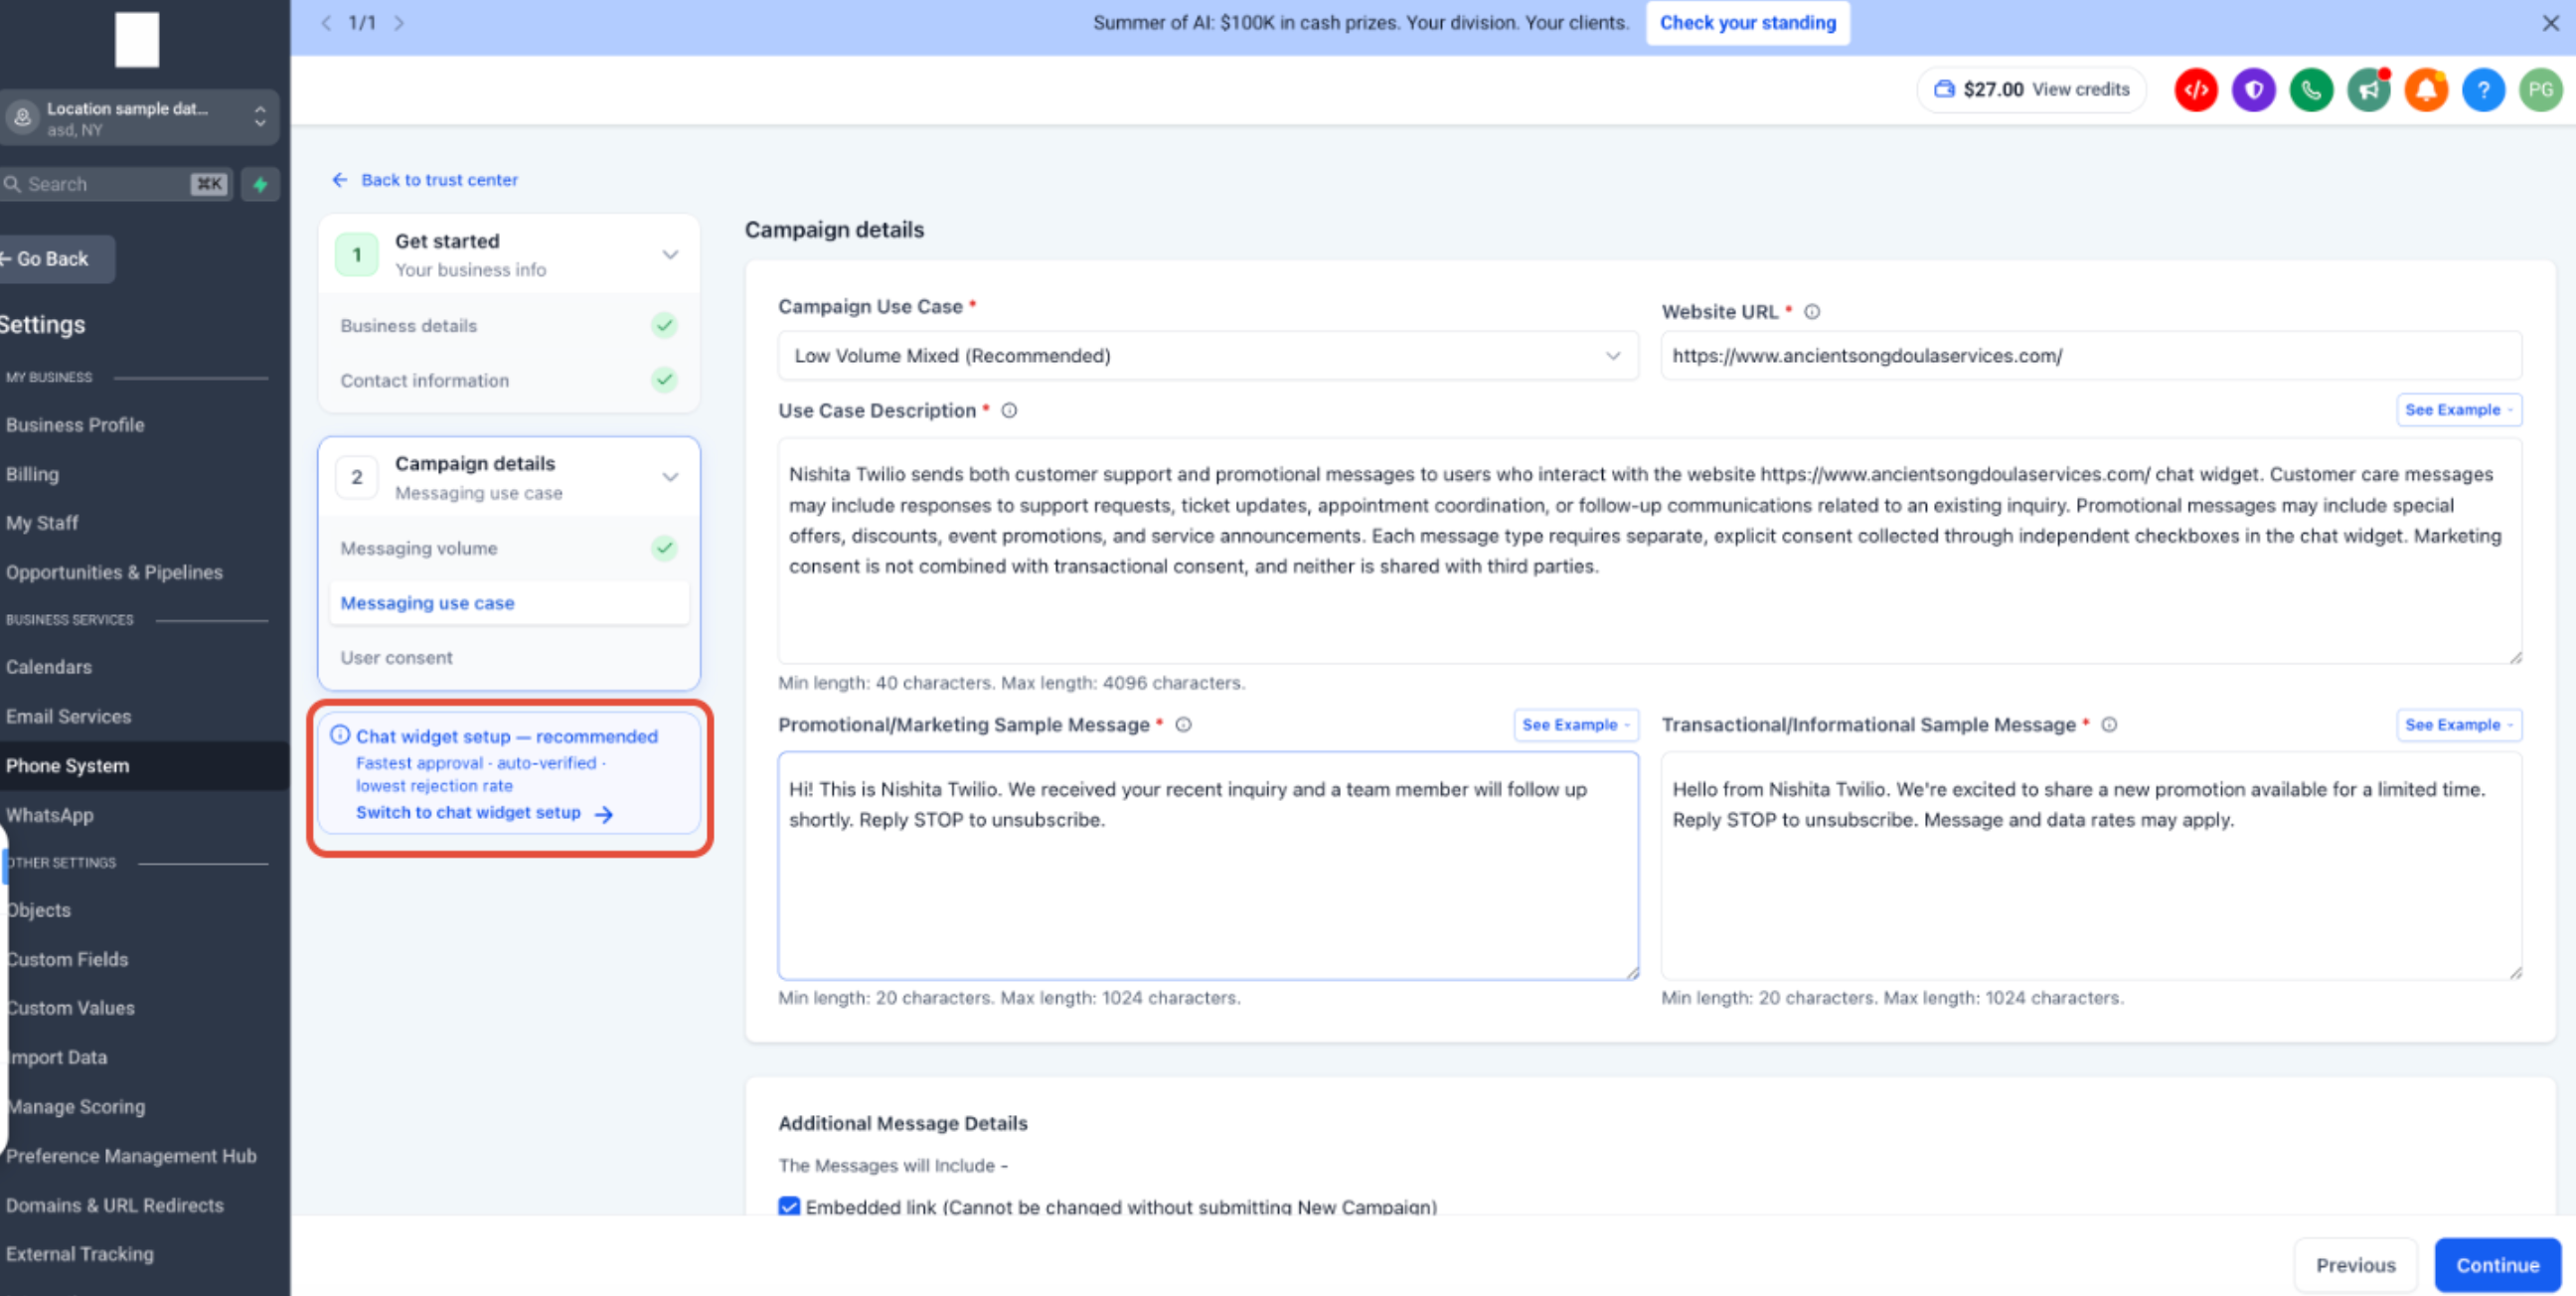
Manual Setup requires you to provide the Campaign and consent information that would otherwise be generated through Chat Widget Setup. Keep each field aligned with the messaging program recipients will actually receive.
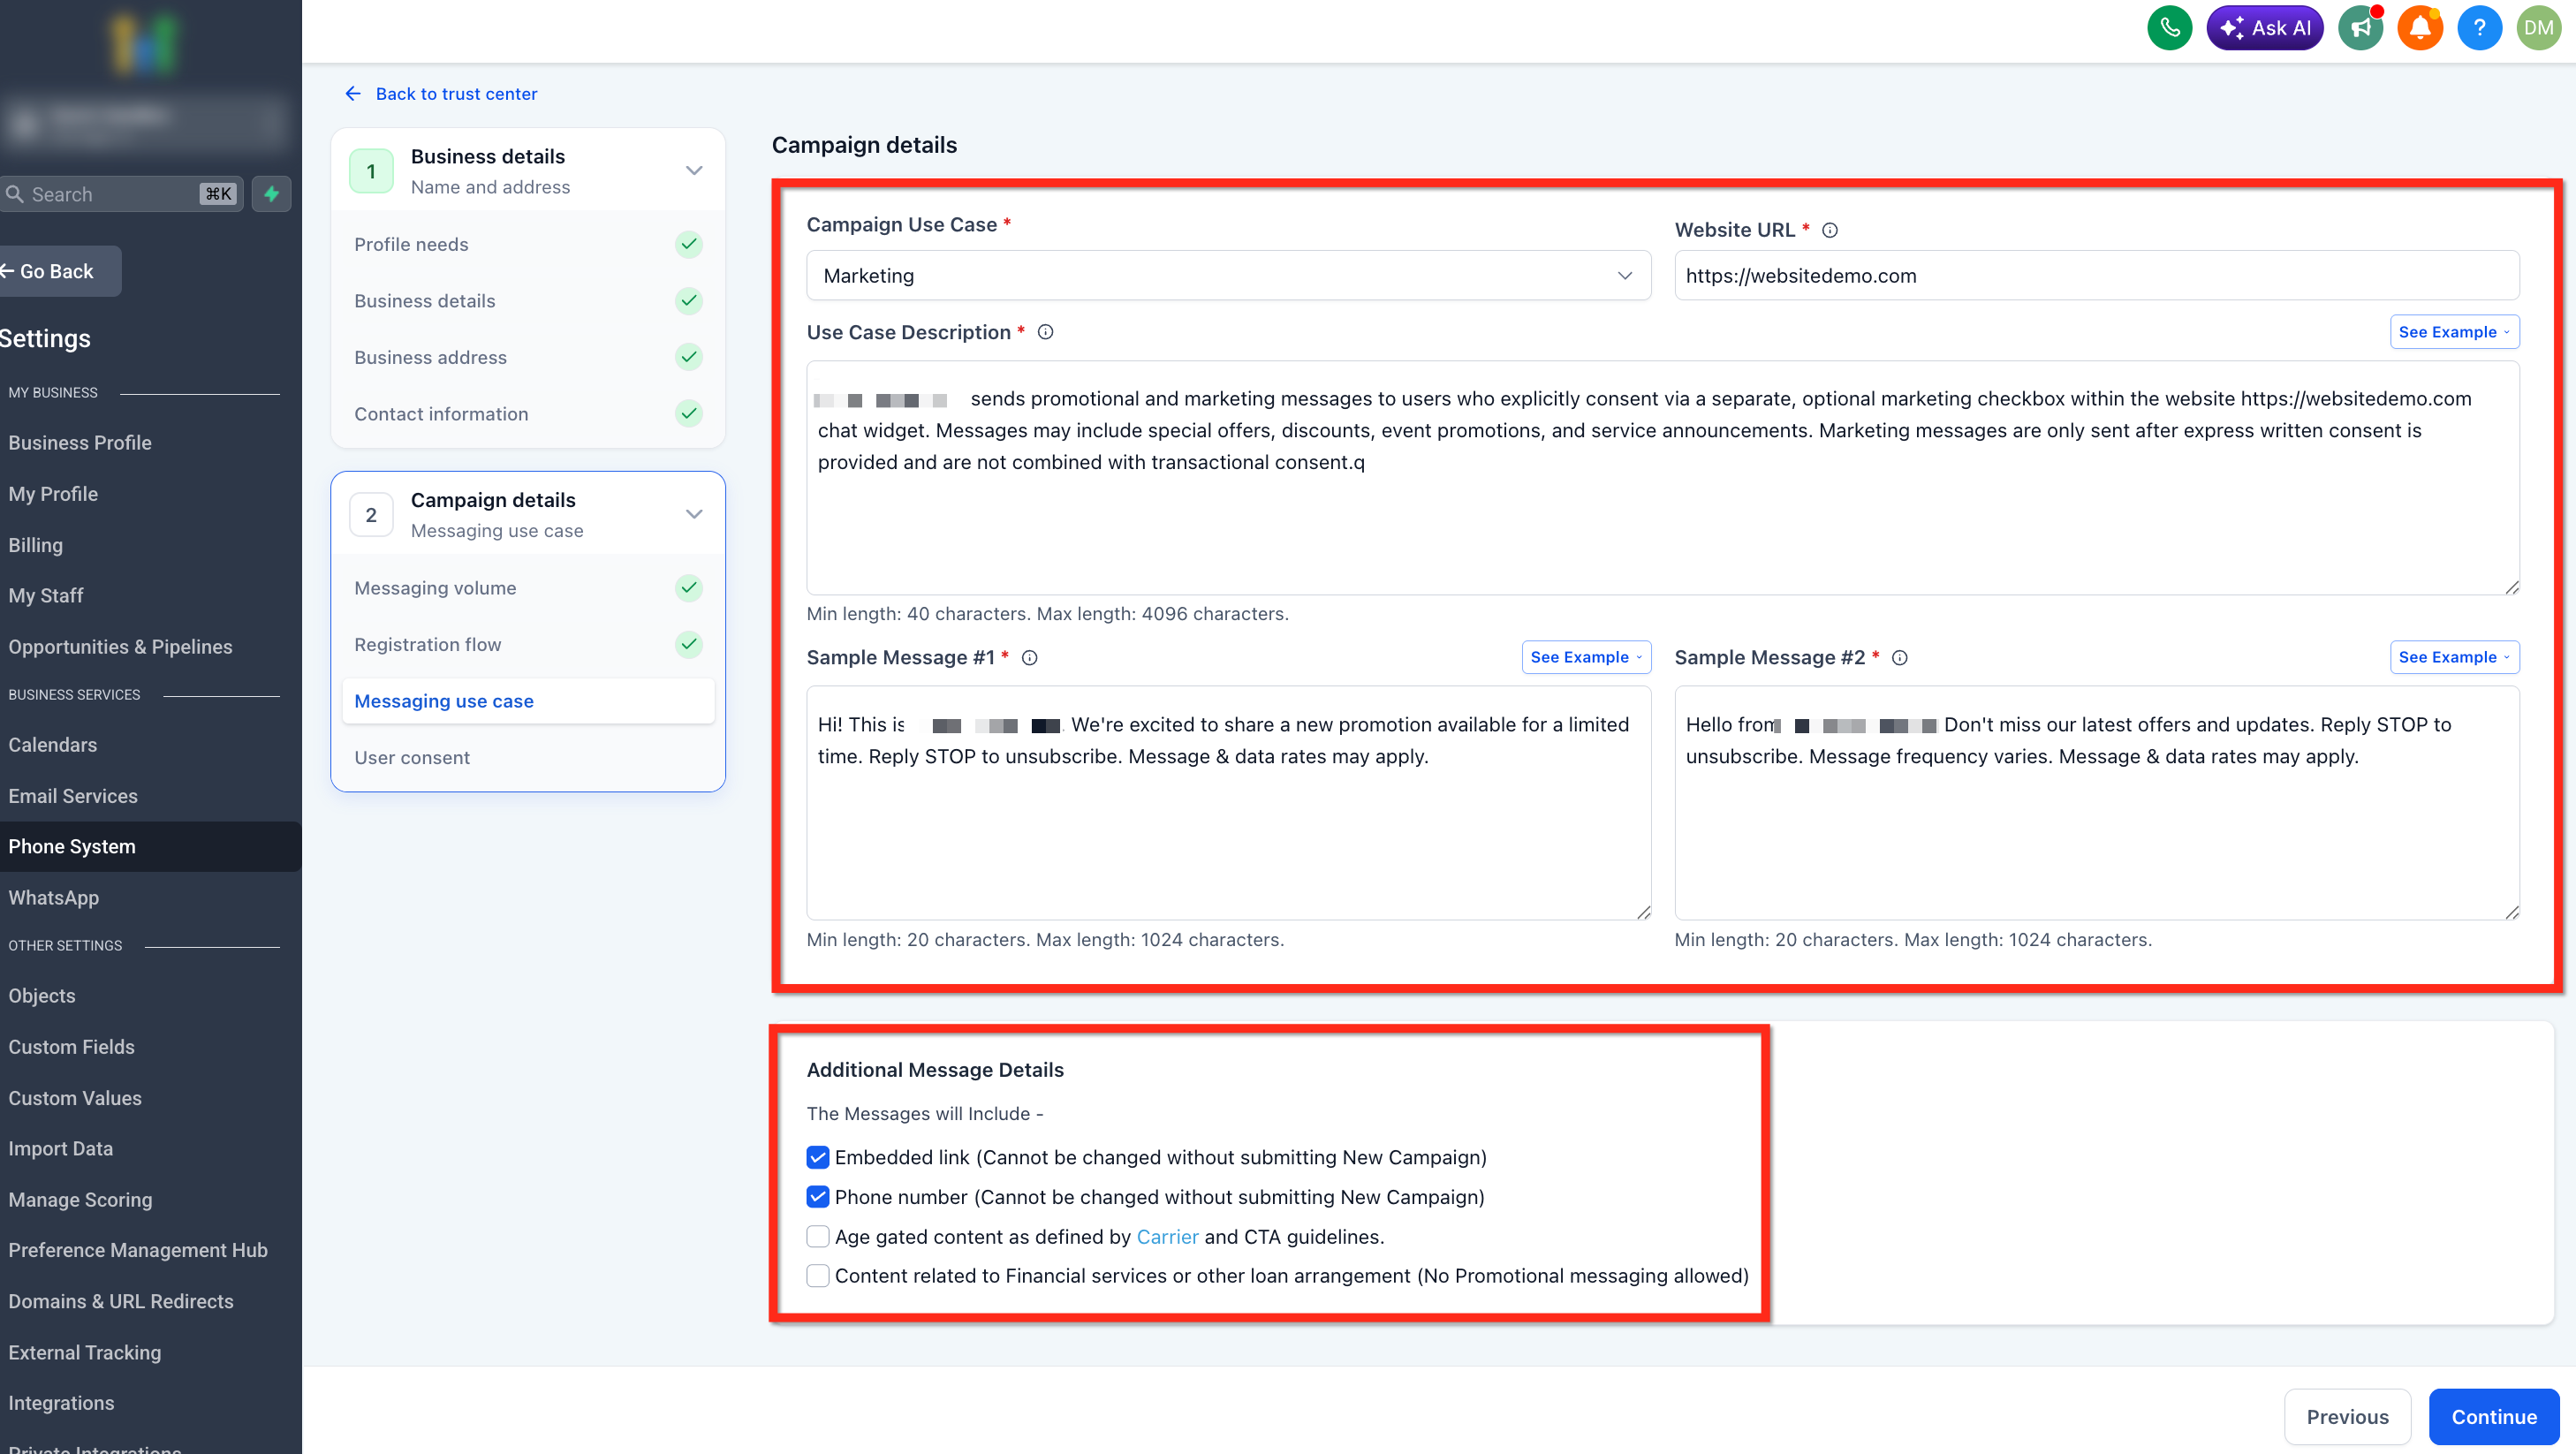
Manual Setup requires clear documentation of how contacts provide permission to receive SMS. Your consent method and language should align with the Campaign use case and sample messages.
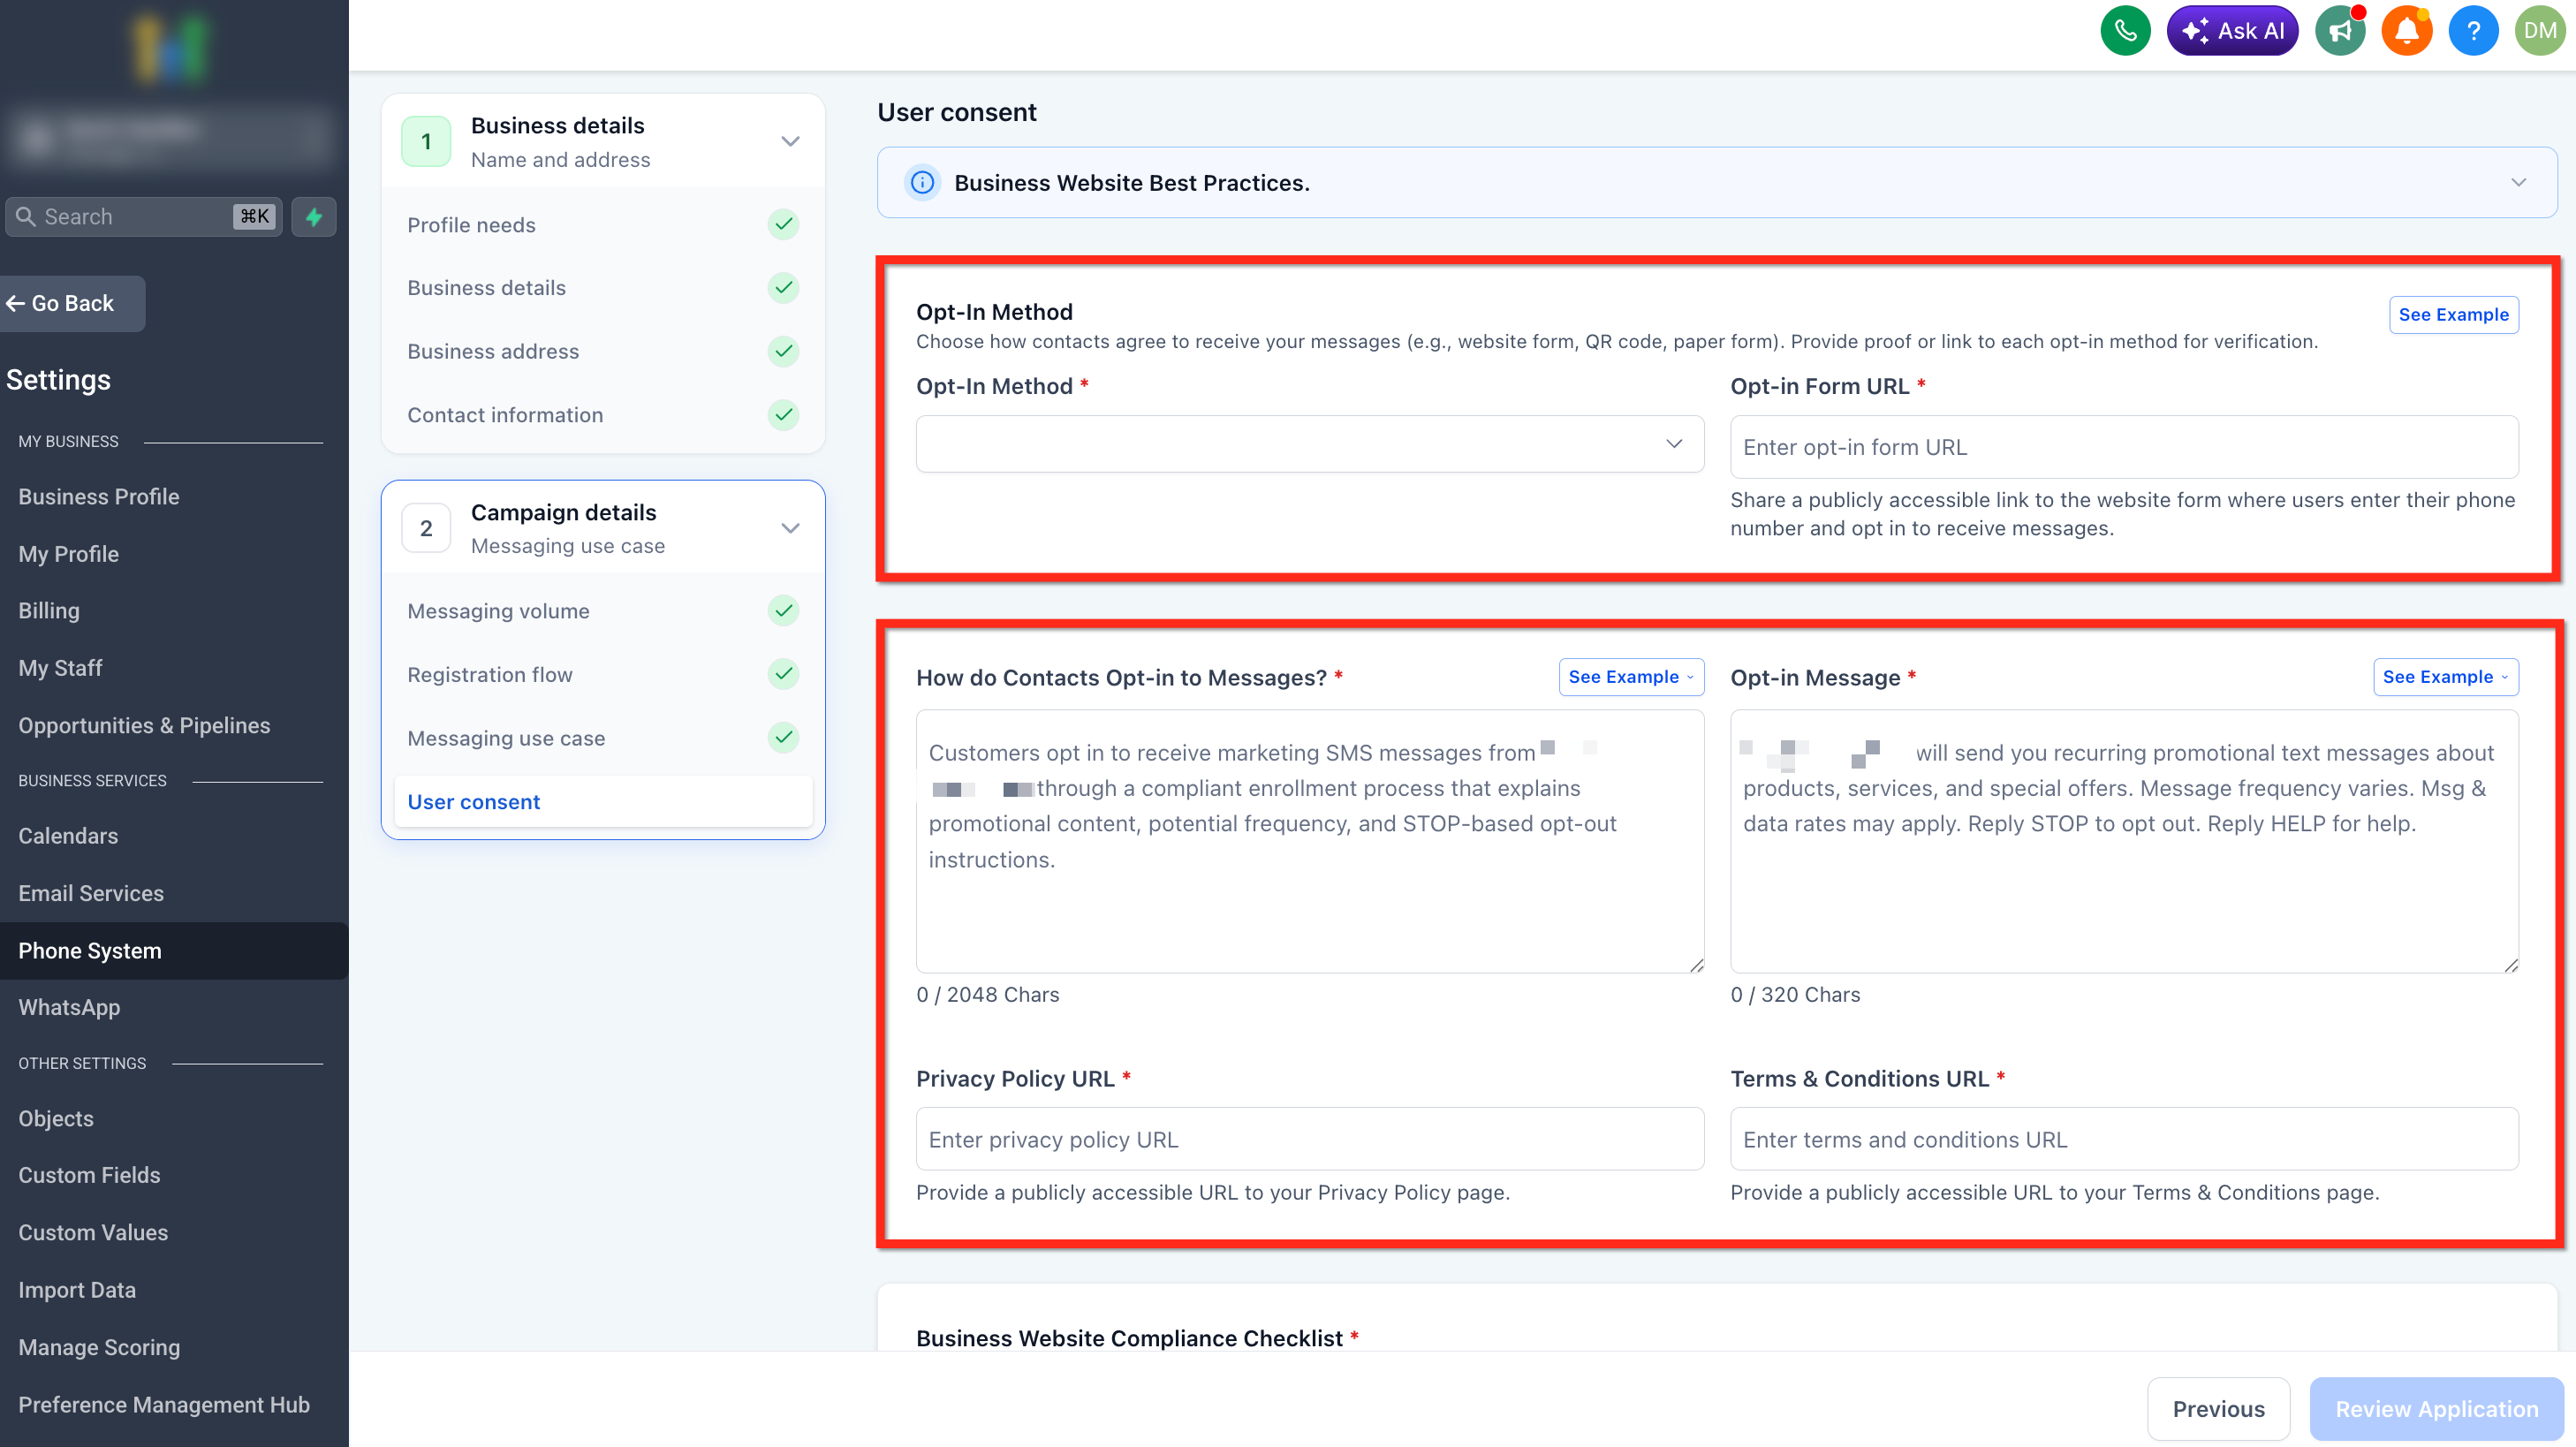
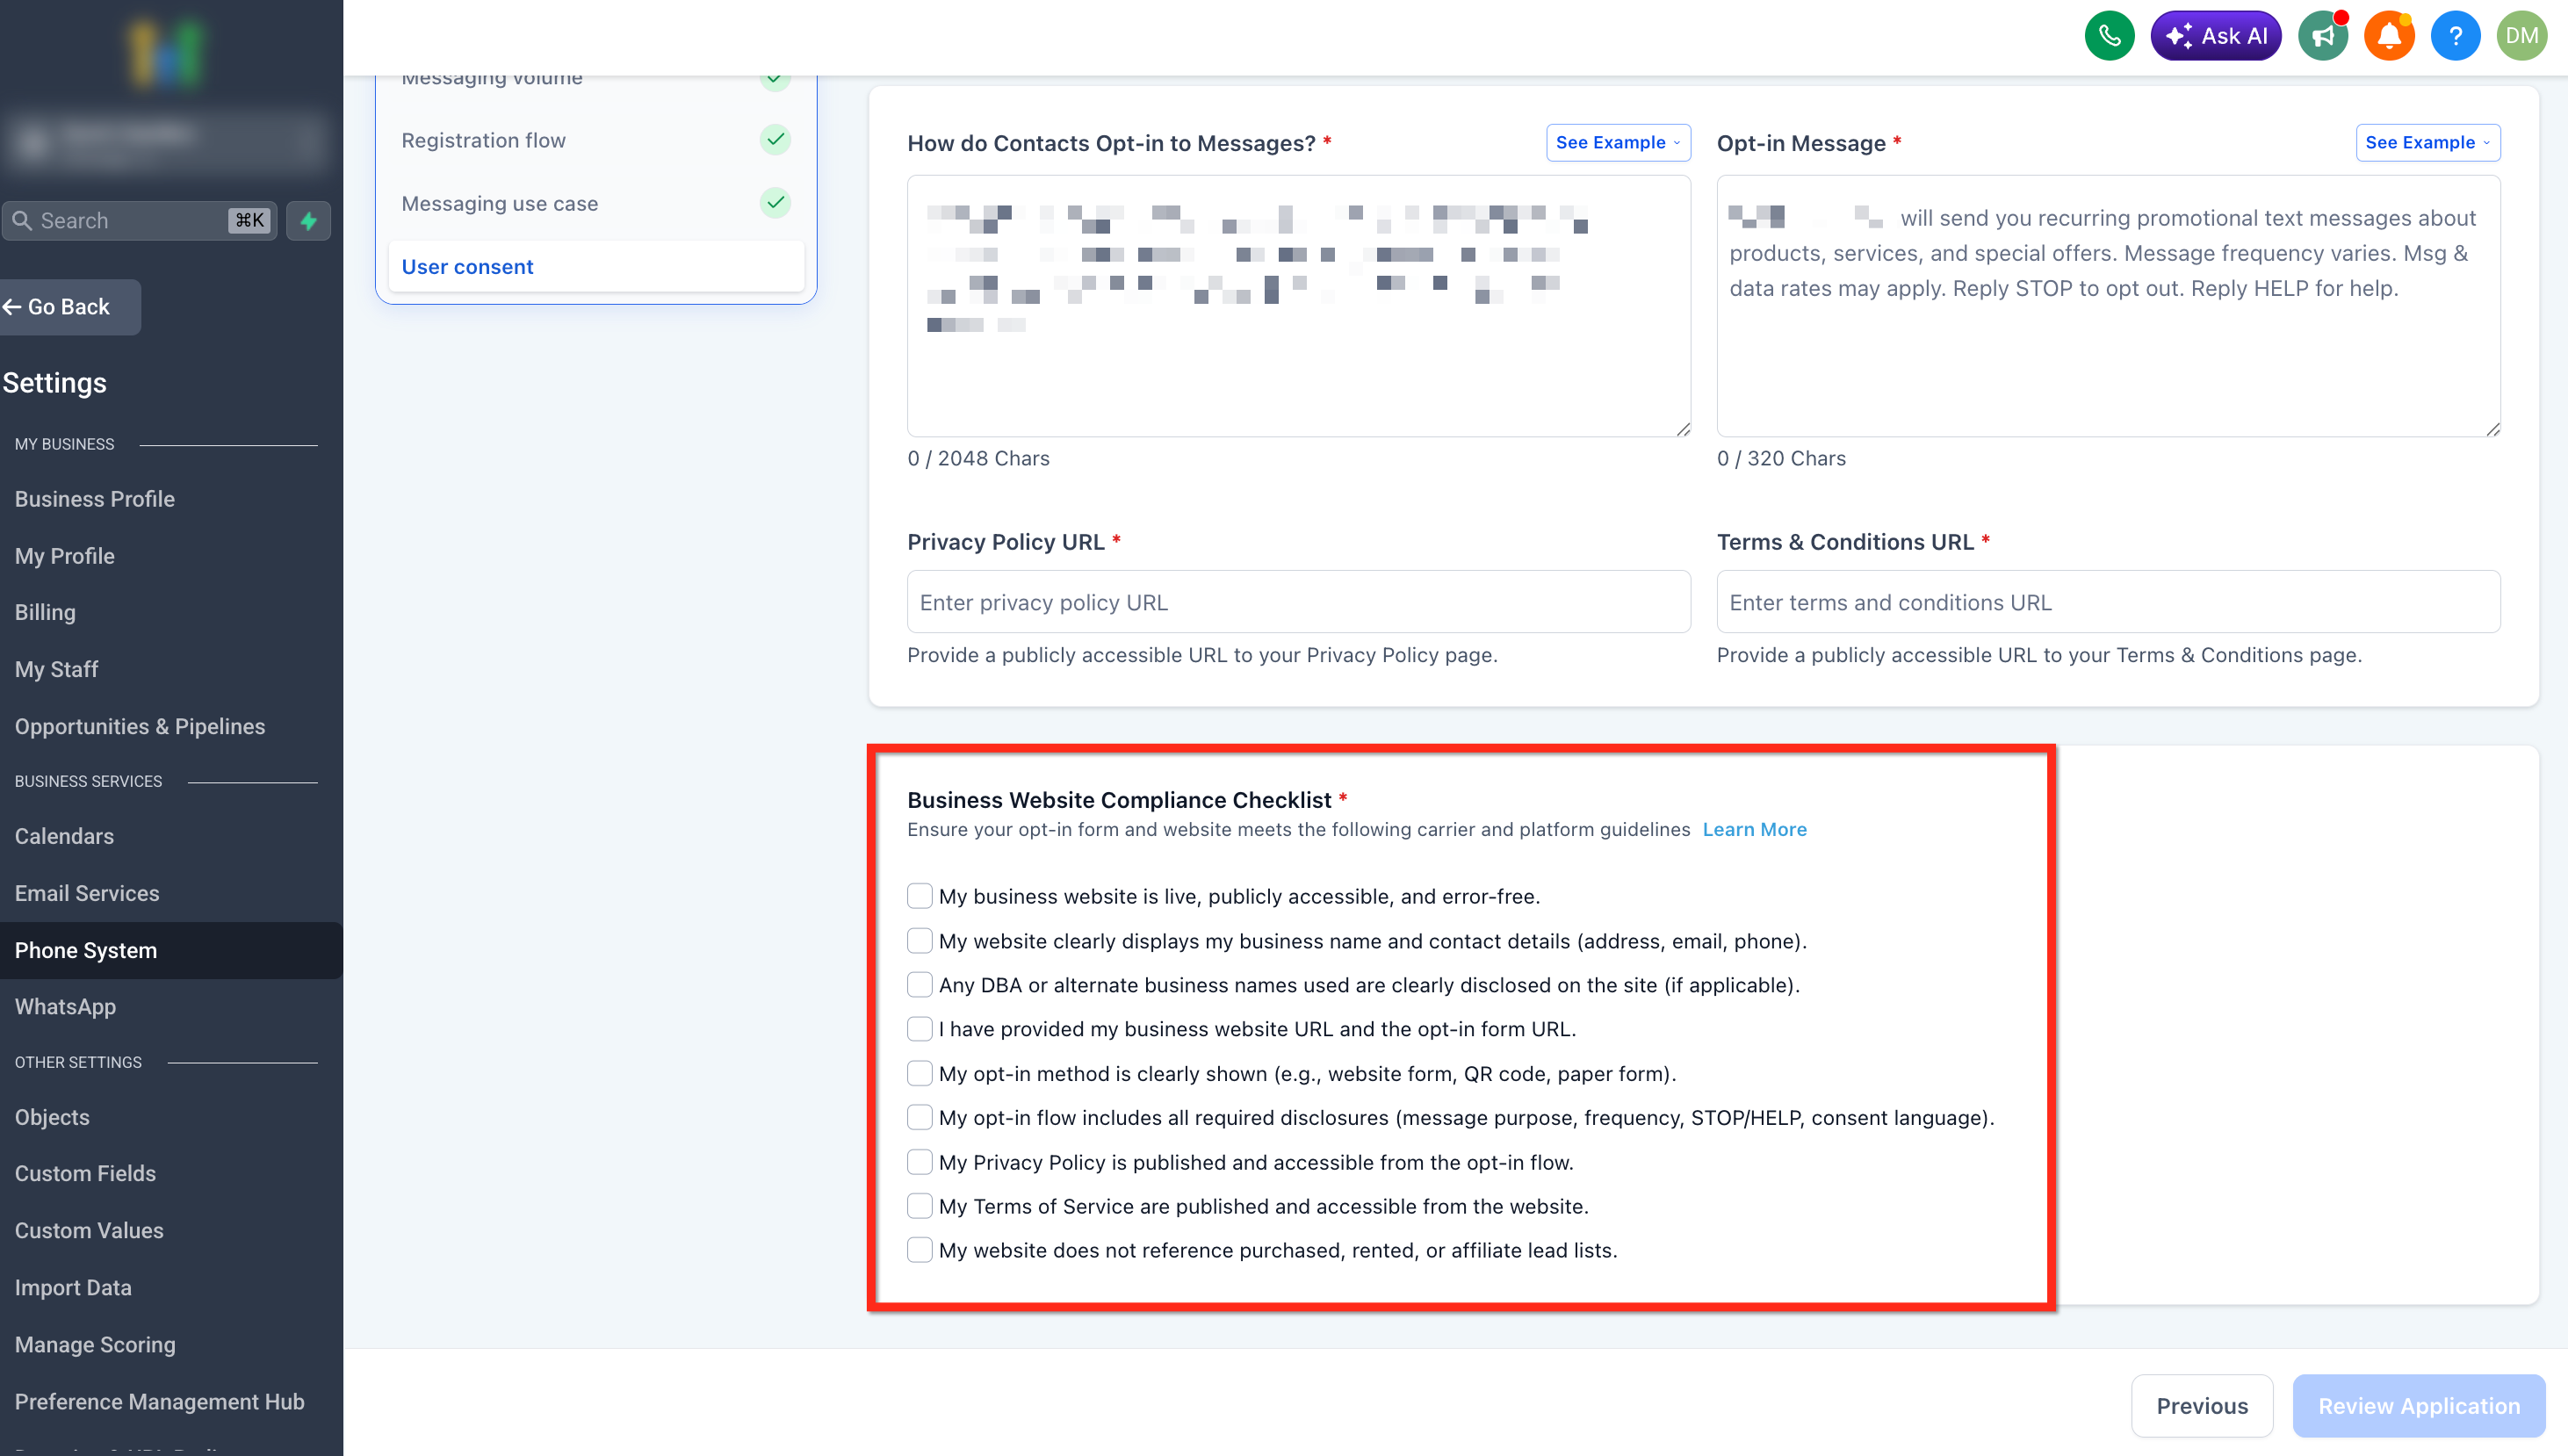
Review the business website checklist to make sure reviewers can verify the business, consent method, and required legal information before submission.
After reviewing all checklist items, select Review Application.
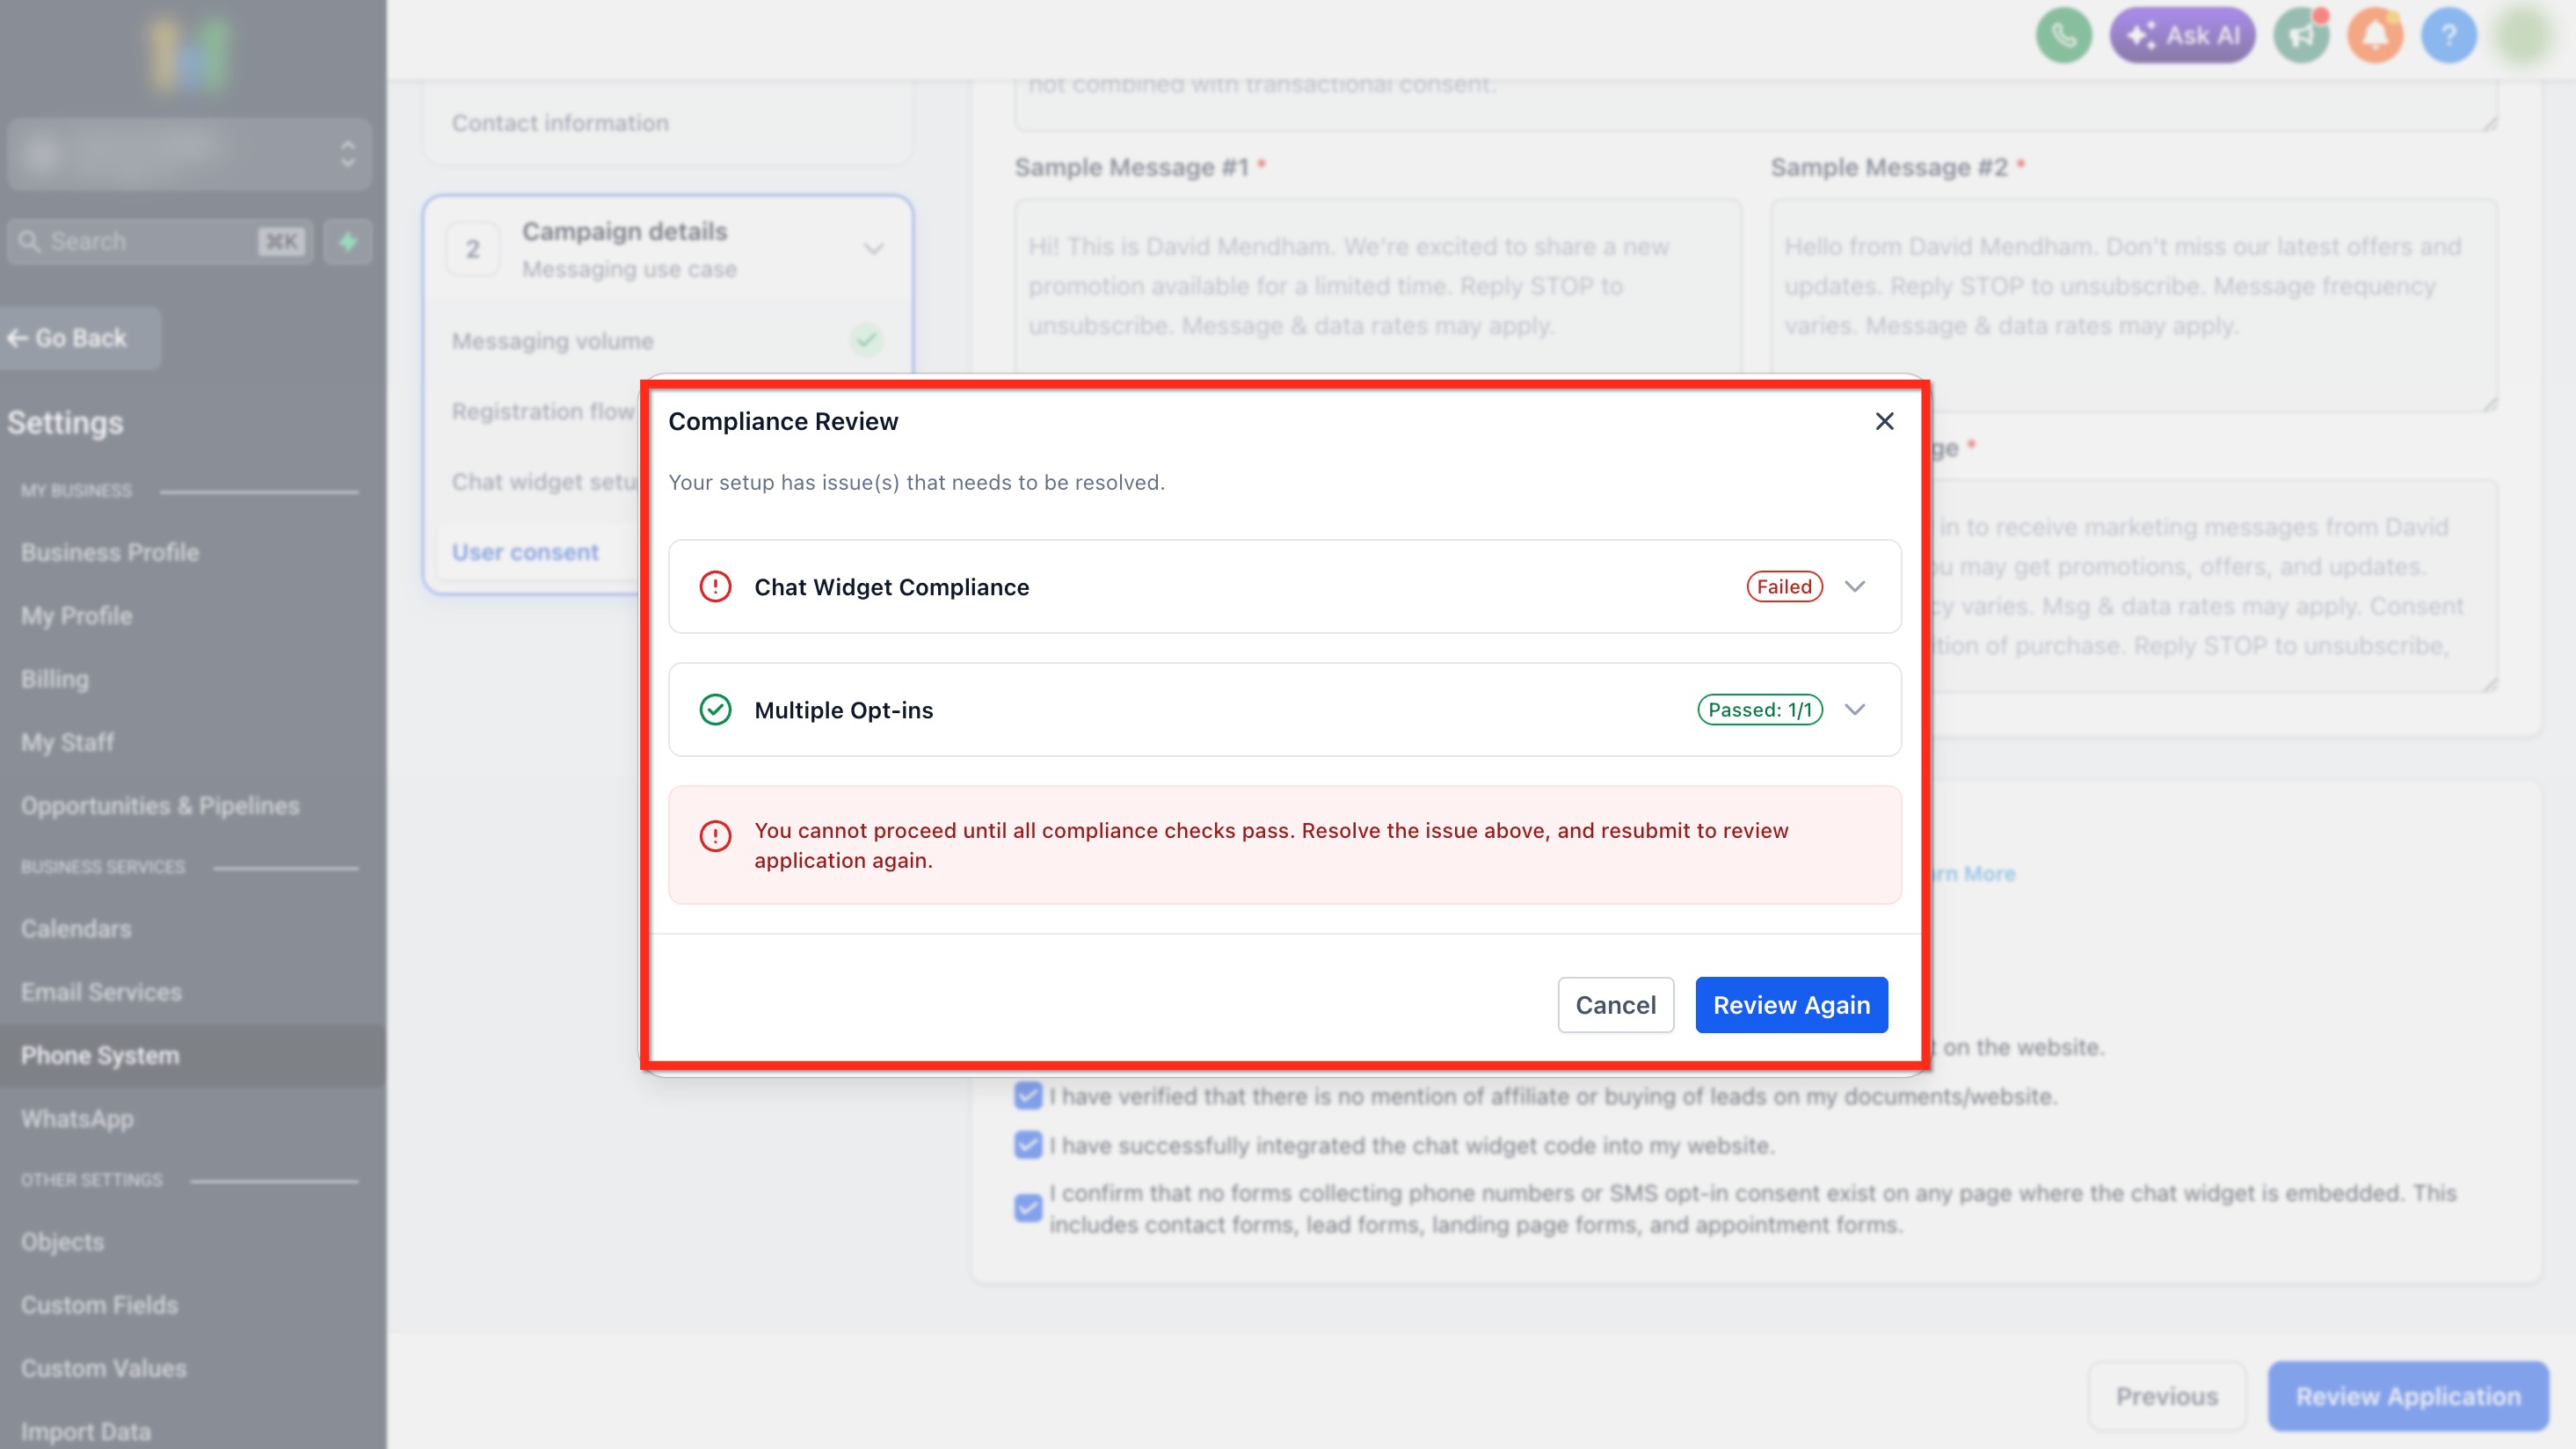
Step 6: Run Compliance Review and Submit
The compliance review checks Campaign and website information for issues that should be corrected before submission. Passing the initial checks prepares the application for carrier review but does not guarantee final approval.
Select Review Application. If a check fails, review the issue, correct the required information, and run the review again. Once all required checks pass, submit the Campaign for carrier review.
After Your A2P Campaign is Approved
An approved Campaign can be used for messaging after the applicable sending phone number is properly associated with it. Confirming the number-to-Campaign connection helps prevent an approved registration from appearing complete while SMS is still unable to use the A2P route.
- Go to Settings > Phone System > Phone Numbers.
- Locate the phone number you want to use for messaging.
- Confirm that the number displays the A2P Verified status.
- If the status is missing, link the number to the approved A2P Campaign.
- Repeat this check whenever you purchase or add another applicable local number.
Troubleshooting A2P After Submission
Campaign status helps determine whether you should wait for review, correct a rejection, or troubleshoot the sending phone number after approval.
| Campaign Status | What It Means | What to Do Next |
|---|---|---|
| Pending | The Campaign is still under review. | Wait for the review to finish. Do not create a duplicate Campaign while the current submission is Pending. |
| Rejected | One or more issues were identified during review. | Open the required fixes, correct all applicable issues, and follow the available resubmission guidance. |
| Approved, but SMS is not working | The Campaign is approved, but the sending number may not be linked correctly or the failure may have another cause. | Verify that the sending number is linked to the approved Campaign and shows A2P Verified. If already verified, troubleshoot the SMS error separately. |
Frequently Asked Questions
Before Contacting Support
- Confirm that Brand registration is approved or eligible to continue.
- Verify that the selected messaging use case accurately reflects the SMS program.
- For Mixed messaging, confirm that the Campaign Use Case shows Low Volume Mixed.
- For Mixed messaging, confirm both consent checkboxes are present and neither is pre-selected.
- Confirm the submitted website and consent experience are live and publicly accessible.
- Review any required fixes or compliance recommendations shown in the registration interface.
Still Need Help?
Contact Support with the affected sub-account, Brand and Campaign status, selected messaging use case, submitted website URL, relevant error or rejection details, and screenshots of the affected registration screens. Do not include passwords, API keys, access tokens, or other sensitive credentials.